
Introduction to Docker
Docker is an open-source containerization platform that is designed to allow developers to easily deploy, create, and run applications using containers. The basic concept of containerization is to encapsulate an application and its dependencies in a self-contained container making it easier to develop, deploy, and run applications across different environments.
It offers an efficient and flexible way to manage virtualized applications in a portable manner. Unlike traditional virtual machines that require a virtual copy of an operating system, Docker runs a container using host operating system resources. This means that Docker Containers are significantly lighter and less resource-intensive than traditional virtual machines. They run faster, take up less storage space, and consume fewer system resources. Docker is widely adopted in the software development industry due to its portability, scalability, and ease of use.
Docker is based on the client-server architecture, where the client interacts with the Docker daemon to create, manage, and run the containers. The client can be a command-line interface, a graphical user interface tool, or a remote service that communicates with the Docker daemon over the network using the Docker API.
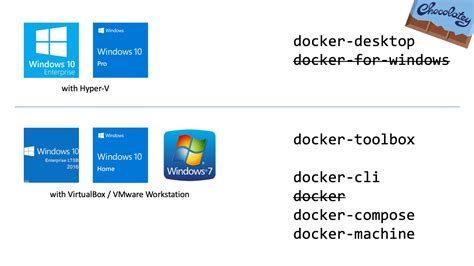
The Docker toolbox is the recommended way to install Docker on your local machine. It provides everything you need to get started with Docker, including a Docker engine, a Docker command-line client, Docker Machine, and much more. Docker toolbox is available for Windows, Mac OS, and Linux operating systems.
To get started with Docker, first, you need to install Docker Toolbox on your local machine. The installation process varies depending on your operating system. You can download the installer from the official Docker website or use a package manager to install it.
Once you have installed Docker Toolbox, you can start using Docker to create and run containers. You can create a container using an existing image or create an image from a Docker file. The Docker file is a script that contains all the commands to build a custom image. You can also manage the containers using Docker cli or using any tool that supports Docker API.
In conclusion, Docker is a powerful containerization platform that provides a portable, localized environment for running applications. It simplifies the way software development is done, making it much more efficient, scalable, and cost-effective. Docker is widely adopted in the industry due to its ease of use, portability, and flexibility. With its rising popularity, learning Docker is a valuable skill for any software developer.
System Requirements for Docker Installation
Docker is a powerful tool that can help developers build, test, and deploy applications with ease. However, before you can start using Docker, you need to make sure that your system meets the necessary requirements. In this article, we will explore the essential system requirements for Docker installation.
Operating Systems Requirements
The first thing you need to consider when installing Docker is the operating system running on your machine. Docker can be installed on many different types of operating systems, including Linux, Windows, and macOS. However, the requirements for each operating system may vary.
Linux Requirements
If you’re using Linux, then you need to ensure that you’re running one of the supported Linux distributions. Docker recommends using Ubuntu, Debian, CentOS, Fedora, or Red Hat Enterprise Linux (RHEL). Additionally, the system should have the following specifications:
- 64-bit version of Linux kernel 3.10 or higher
- Kernel support for cgroups and namespace
- At least 2 GB of RAM
- At least 3 GB of free disk space
- x86_64 compatible CPU
- Network connection for downloading and installing Docker packages and dependencies
It’s also recommended to disable the swap memory on your Linux machine before installing Docker. This will ensure that Docker performs optimally on your system.
Windows Requirements
For Windows users, Docker can be installed on Windows 10 or Windows Server 2016. The system should also have the following requirements:
- 64-bit version of Windows
- At least 4 GB of RAM
- At least 20 GB of free disk space
- Hyper-V and Containers features enabled
- Windows PowerShell 5.0 or higher
- Virtualization technology enabled in BIOS or UEFI firmware
It’s worth noting that running Docker on Windows systems may require a Pro or Enterprise version of Windows. Additionally, containers running on Windows systems require the use of Microsoft’s Hyper-V technology.
macOS Requirements
If you’re a macOS user, then Docker can be installed on macOS 10.13 or newer versions. The system should also have the following requirements:
- At least 4 GB of RAM
- At least 20 GB of free disk space
- macOS 10.13 “High Sierra” or newer
It’s important to note that Docker Desktop for Mac requires macOS 10.14 or above.
Conclusion
Before installing Docker, you need to make sure that your system meets the necessary requirements based on the operating system you’re using. Failure to meet these requirements may result in poor performance or errors during installation. However, by ensuring that your system meets these requirements, you can be confident in installing Docker and using it to develop, test, and deploy your applications with ease.
Docker Installation Tutorial for Linux Systems
Install Docker on Linux Systems
Docker is a powerful tool for containerization and it is widely used in the industry. In this tutorial, we will discuss how to install Docker on Linux Systems.
Before Installation
Before installing Docker on Linux Systems, you need to ensure that your system meets the minimum requirements. Your system should have a 64-bit operating system and a Linux Kernel of 3.10 or higher. In addition, you should have administrative rights to install Docker.
Step 1: Update System
Before installing Docker, you should ensure that your system is updated with the latest packages. You can do that by running the following commands:
sudo apt-get update
sudo apt-get upgrade
Step 2: Install Required Dependencies
You need to install some dependencies before installing Docker. You can install these dependencies by running the following command:
sudo apt-get install apt-transport-https ca-certificates curl gnupg lsb-release
Step 3: Add Docker’s Official GPG Key
You need to add Docker’s official GPG key to your system by running the following command:
curl -fsSL https://download.docker.com/linux/ubuntu/gpg | sudo gpg --dearmor -o /usr/share/keyrings/docker-archive-keyring.gpg
Step 4: Add Docker Repository
After adding Docker’s official GPG key, you need to add Docker’s repository to your system’s sources.list.d directory by running the following command:
echo \
"deb [arch=amd64 signed-by=/usr/share/keyrings/docker-archive-keyring.gpg] https://download.docker.com/linux/ubuntu \
$(lsb_release -cs) stable" | sudo tee /etc/apt/sources.list.d/docker.list > /dev/null
Step 5: Install Docker
After adding Docker’s repository, you can install Docker by running the following command:
sudo apt-get update
sudo apt-get install docker-ce docker-ce-cli containerd.io
Step 6: Verify Docker Installation
You can verify Docker installation by running the following command:
sudo docker run hello-world
If Docker is installed successfully, you should see a message from the hello-world Docker container.
Conclusion
In conclusion, installing Docker on Linux Systems is a simple process. By following the above-mentioned steps, you can easily install Docker and start containerizing your applications.
Install Docker on Windows Systems

If you’re a developer, system administrator, or a user who wants to build, ship, and run distributed applications in containers, you need Docker. Docker is a tool that simplifies the process of building, shipping, and running applications in containers. Containers are self-contained, lightweight, and can run on any operating system, making them an excellent solution for building distributed applications. Docker can run on various platforms, and Windows 10 is one of them.
Here’s a detailed guide on how to install Docker on Windows 10 machines:
Contents
- 1 Step 1: Check system requirements
- 2 Step 2: Download Docker Desktop
- 3 Step 3: Install Docker
- 4 Step 4: Configure Docker
- 5 Step 5: Verify Docker installation
- 6 Conclusion
- 7 Step 1: Check the System Requirements
- 8 Step 2: Install Docker Desktop for Mac
- 9 Step 3: Run Docker for Mac
- 10 Step 4: Verify Your Installation
- 11 Step 5: Install Docker Compose
- 12 Conclusion
Step 1: Check system requirements

Before installing Docker, check your system requirements. Windows 10 64-bit version is mandatory, and the version must be the Pro, Enterprise or Education version (14393 and later). If you don’t know your system specifications, go to the System Information app by pressing the Windows key + R and typing msinfo32.exe.
Step 2: Download Docker Desktop

Once you’ve checked your system requirements, go to the Docker website and download the Docker Desktop installer for Windows.
Step 3: Install Docker

After downloading the Docker Desktop installer, double-click the EXE file and follow the installation wizard. The installer will automatically detect your system configuration and install the appropriate Docker components.
Step 4: Configure Docker

Once you’ve installed Docker, you need to configure it. Docker Desktop comes with all the necessary settings configured by default, so you do not need to do anything extra.
You can access Docker settings by right-clicking the Docker Desktop icon in the system tray and selecting Settings. Here you can configure all the necessary settings for Docker, and adjust the resources allocated to it.
Step 5: Verify Docker installation
Once you’ve configured Docker, it’s time to verify that it’s working correctly. To do this, search for Docker in the Start menu and select Docker Desktop.
If Docker is installed properly, you should see the Docker Desktop dashboard. The dashboard provides all the necessary tools to build, ship, and run Docker containers, and displays the status of the Docker system and its components.
You can also verify the installation by opening the Command Prompt or Windows PowerShell and typing:
docker –version
If Docker is installed successfully, it will display the current version of Docker installed on your system.
Conclusion
Installing Docker on Windows can be a bit daunting, especially for beginners, but it should not take more than a few minutes. Follow the steps detailed in this article, and you’ll be up and running with Docker in no time.
Docker can be an excellent tool for developers, system administrators, and users who want to build, ship, and run distributed applications in containers. With Docker, you can eliminate many of the headaches associated with traditional application deployment, and take advantage of the many benefits that containers provide, such as portability, scalability, and efficiency.
Install Docker on Mac Systems
If you’re a developer working on a Mac system, it’s important to have Docker installed on your machine. Docker is a popular platform that allows developers to build, test, and deploy applications in a containerized environment. In this tutorial, we’ll walk you through the steps of installing Docker on your Mac system.
Step 1: Check the System Requirements
Before installing Docker on your Mac, it’s important to ensure that your system meets the minimum requirements. You’ll need an Intel Mac running macOS 10.13 or later. Additionally, your system must have at least 4GB of RAM and virtualization support enabled.
Step 2: Install Docker Desktop for Mac
The easiest way to install Docker on your Mac is to use Docker Desktop for Mac, a simple and easy-to-use graphical interface that simplifies the installation process. To download Docker Desktop for Mac, visit the Docker website and click on the “Download Docker Desktop for Mac” button.
Once the download is complete, double-click on the Docker.dmg file to begin the installation process. Follow the on-screen instructions to complete the installation process.
Step 3: Run Docker for Mac
After installing Docker Desktop for Mac, you’ll need to run the application to start using Docker. You can find the Docker icon in your Applications folder; double-click on the icon to launch Docker.
When you run Docker for the first time, you’ll be prompted to enter your username and password. This is necessary to grant Docker access to certain system resources.
Step 4: Verify Your Installation
Once Docker is up and running, you can verify that it has been installed correctly by opening up a terminal window and running the following command:
docker versionIf Docker has been installed correctly, you should see information about the Docker client and server versions in the terminal window.
Step 5: Install Docker Compose
Docker Compose is a tool that allows developers to define and run multi-container applications. It’s a useful tool that can make it easier to manage complex applications that consist of multiple containers.
To install Docker Compose on your Mac, open up a terminal window and enter the following command:
brew install docker-composeThis command will download and install the Docker Compose binary on your machine. Once the installation is complete, you can verify that Docker Compose has been installed correctly by running the following command:
docker-compose versionIf Docker Compose has been installed correctly, you should see information about the Docker Compose version in the terminal window.
Conclusion
In this tutorial, we’ve walked you through the steps of installing Docker on your Mac system. We’ve covered the minimum system requirements, installing Docker Desktop for Mac, running Docker, verifying your installation, and installing Docker Compose. With Docker up and running on your machine, you’ll be able to build, test, and deploy your applications in a containerized environment.