
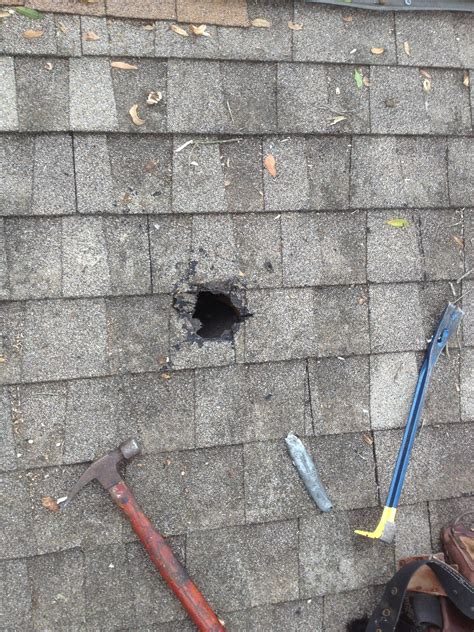
Assessing the Damage: Identifying the Location and Extent of the Hole
One of the most problematic issues encountered by homeowners is a hole in the roof. A hole can be caused by several factors, including faulty installation, natural wear and tear, strong winds, heavy rainfall, among many others. Regardless of the cause, the damage left behind is usually disastrous and detrimental to the structure of the house. The longer a hole is left unattended, the more severe the damage to the roof may become. It is, therefore, imperative to fix it promptly and correctly.
Before embarking on fixing a hole in the roof, it is vital to examine the damage to determine its location and extent. Here are the steps to follow:
Contents
Step 1: Inspect Your Roof
Start by checking your roof from the inside out. Using a flashlight, go to the attic or crawl space and carefully examine the underside of the roof. Look out for signs of sunlight shining through the holes, moisture stains, or watermarks. If you find any of these signs, it indicates a hole in the roof. Paying close attention to these details will help you determine the location and extent of the damage. Depending on the severity of the damage, you may need to assess the roof’s exterior further.
Step 2: Conduct An Exterior Inspection
Carefully examine the outside of your roof, starting with the area where you spotted a hole from the inside. Look for visible signs of damage such as missing shingles, holes, or cracks in the roofing material. If you find the area beyond your control, probably due to height or unsafe conditions, you may need to hire a professional to inspect it further. If you can access the roof, ensure to exercise caution by using a secure ladder, gloves, and a safety harness. It would be best to seek help from a friend or family member to hold the ladder as you climb it.
Step 3: Identify the Extent of the Damage
After inspecting the roof’s exterior, identify the size, location, and extent of the damage. A hole can be small or extensive, depending on the cause and the material of your roof. If it is a small hole, you may be able to fix it yourself using simple tools and materials. An extensive hole will require a professional roofer’s expertise. Determine your level of experience and the extent of the damage before embarking on a DIY project since fixing a hole requires more than just applying sealant or patching the hole.
Step 4: Document the Damage
Before fixing the hole, it is essential to document the extent of the damage for reference. Take pictures of the hole and its surrounding before you begin any repairs. Documenting the damage provides you with evidence of the extent of the damage and will help with insurance claims if necessary.
In conclusion, fixing a hole in the roof requires patience, attention to detail, and above all, caution. Identifying the location and extent of the damage is the first step to repairing the hole to prevent further damage. Following the above steps will help you assess the damage thoroughly and offer some insights on the resources you will need in time and money to fix the hole.
Gathering the Necessary Materials: Tools and Materials You’ll Need for the Job
If you have discovered a hole in your roof, it is essential to fix it immediately. Failing to do so will result in water seepage, which could damage the interior of your home. A hole in your roof can arise from various factors, such as hailstorms, tree damage, or wear and tear over time. Regardless of the underlying reason, you need to ensure that the repair process is conducted efficiently.
The first step to repairing your roof is to gather the necessary materials. It’s essential to have all the tools needed before starting the task to prevent interruptions midway through the process if you find that you don’t have the required tools. Here’s a list of tools and materials that you’ll need:
- Safety equipment: As with any home repair project, safety is paramount. You need to ensure that you have the necessary safety equipment, such as a hard hat, safety harness, and slip-resistant shoes. Since you will be working from heights, you need to protect yourself from any potential falls.
- Roofing nails: You will need roofing nails to fasten the replacement shingles to the roof deck. The type of shingles you’re using will dictate the type of nail you require. For instance, if you’re using asphalt shingles, you can use electro-galvanized roofing nails, while if you’re using wooden shakes or shingles, you will need hot-dipped galvanized nails.
- Hammer: A hammer is an essential tool to have. You’ll use it to pry shingles from the roof and fasten them to the roof deck. Ensure that you have a reliable hammer that’s comfortable to use and has a good grip.
- Roofing felt: Roofing felt serves as an underlayment that is placed between the roof deck and shingles. It serves as a barrier that protects the wood underneath from moisture damage and other elements. You should have enough roofing felt on hand to install a layer covering the area of repair.
- Roofing adhesive: You will use roofing adhesive to connect the shingles to the roof deck. Roofing adhesive is essential because it helps to strengthen the bond between the shingles and the roof deck, preventing wind damage and water seepage.
- Caulking gun: A caulking gun comes in handy when you need to apply roofing adhesive to the shingles’ underside. Ensure that you have a caulking gun with a comfortable grip and a smooth dispensing mechanism.
- Chalk line: A chalk line tool will help you to mark straight lines on the roof surface, making it easier to place the shingles in a neat and uniform manner.
- Ladder: A ladder is an essential tool, particularly when working on a roof. Ensure that the ladder is sturdy, with a firm grip and sufficient height to reach the damaged area.
Once you have gathered all the necessary tools and materials, you’re ready to begin repairing the hole on your roof. It’s important to note that repairing a roof is a complex process that requires skill and experience, so if you’re not confident in your abilities, it is best to seek professional help.
It is also essential to carry out regular roof maintenance inspections to detect any potential sources of roof damage. This way, you can address the issues before they escalate and cause more significant problems.
Patching the Hole: Step-by-Step Guide to the Repair Process
Your roof is one of the most important parts of your home, and you want to take care of it if you notice any damage. A hole in your roof can cause significant problems for your home, such as water damage, mold, and pest infestations. Repairing a hole in your roof can seem like a daunting task, but it’s something you can do by yourself. This step-by-step guide will help you fix the hole in your roof and prevent any further damage to your home.
Step 1: Identify the Source of the Leak
Before you start fixing the hole in your roof, you need to identify the source of the leak. The source of the leak might not necessarily be where the hole is located. Check the surrounding areas of the hole for any signs of damage or water stains. Check the attic as well for any water stains on the ceiling or walls. Once you’ve identified the source of the leak, you can start preparing to fix the hole.
Step 2: Prepare the Area Around the Hole
Before you start repairing the hole, you need to prepare the area around it. Use a magnifying glass to get a closer look at the hole to determine its size and shape. These details will be important when choosing the patch material. Clean the area around the hole with a broom or brush to remove any debris or dirt. This will help the patch material adhere better to the roof.
Step 3: Patch the Hole
To patch the hole, you will need to purchase a patch kit from your local hardware store. The patch kit should contain a patch material and roofing tar. The patch material comes in various types, such as mesh or aluminum. Choose the patch material that’s suitable for the size and shape of the hole. Cut the patch material according to the size of the hole with a scissor or knife. Apply the roofing tar on the edges of the hole and press the patch material onto it. Apply another layer of the roofing tar on top of the patch and spread it out evenly with a putty knife. Allow the roofing tar to dry completely before you start cleaning up.
In addition to patching the hole, you should also consider waterproofing your roof to prevent any further damage. Waterproofing your roof involves applying a waterproof sealant on the surface of the roof. This will protect your roof from any leaks and damage caused by rain or moisture.
Final Thoughts
Repairing a hole in your roof is not a task to be taken lightly, but it’s something you can do if you follow these steps carefully. Remember to identify the source of the leak, prepare the area around the hole, and patch the hole with the appropriate patch material. Also, don’t forget to waterproof your roof to prevent any future damage. If you’re not comfortable repairing the hole in your roof, you can always hire a professional to help you.
Sealing and Finishing: How to Ensure the Repair is Waterproof and Aesthetically Pleasing
Once the hole in your roof has been patched up, it’s time to seal and finish the repair. This is important to ensure that the repair is waterproof and aesthetically pleasing.
The first step is to apply a sealant to the repaired area. There are different types of sealants available, including silicone, asphalt, and acrylic. Silicone is the most effective sealant for a roof repair, but it can be expensive. Asphalt and acrylic sealants are cheaper alternatives, but they may not last as long as silicone.
Before applying the sealant, make sure the surface is clean and dry. Remove any debris, dirt, or dust from the repaired area. You can use a broom, brush, or vacuum to clean the surface. Once the surface is clean, apply the sealant according to the manufacturer’s instructions. Use a brush, roller, or spray to apply the sealant evenly over the repaired area.
After the sealant has been applied, give it time to dry. This may take a few hours or overnight, depending on the type of sealant used. Once the sealant is dry, test it by pouring some water over the repaired area. If the water beads up and does not penetrate the sealant, then the repair is waterproof.
The next step is to finish the repair. This involves making the repaired area blend in with the rest of the roof. The goal is to make the repair look seamless and aesthetically pleasing.
If the repaired area is a different color than the rest of the roof, you can paint it to match. There are roof paints available that can be used to match any color. Make sure to choose a paint that is compatible with the sealant used to patch up the hole.
If the repaired area is raised or uneven, you can use a roofing cement to smooth it out. Roofing cement can be applied with a trowel or putty knife. Apply the cement evenly over the repaired area and smooth it out. Once the cement is dry, sand it down until it is level with the rest of the roof.
Finally, if the repaired area is visible from the ground, you can use a roof tile to cover it up. Roof tiles are available in different colors and styles, so you can choose one that matches your roof. Place the roof tile over the repaired area and secure it in place with roofing nails.
Overall, sealing and finishing a roof repair is important to ensure that the repair is waterproof and aesthetically pleasing. Use a high-quality sealant and follow the manufacturer’s instructions carefully. Finish the repair by painting, smoothing, or covering it up with a roof tile. With these steps, your roof repair will look as good as new.
Preventative Maintenance: Tips and Tricks for Avoiding Future Roof Holes
Ensuring that your roof remains in good condition is not only important for the overall appearance of your home, but it also prevents the need for costly repairs in the future. Here are some tips and tricks for avoiding future roof holes:
1. Conduct Regular Inspections
Regular inspections are crucial to protecting your roof. It’s recommended to conduct an inspection yearly, or after severe weather conditions. You will want to examine your roof for any signs of wear and tear such as broken or missing shingles, rusted flashing, or any debris that has collected on top.
You can also check your attic for any signs of water damage, such as stains, mold, or mildew. This may indicate that water is seeping in through your roof and can lead to potential holes.
2. Keep Your Gutters Clean
Clogged gutters can cause water to overflow and leak onto your roof, leading to damage over time. Regular cleaning can help prevent this issue and keep your gutters in good condition. Make sure to remove any leaves, debris, or branches from your gutters and clean them out with a hose or pressure washer.
3. Trim Your Trees
Trees can cause damage to your roof if not properly maintained. Overhanging branches can rub against your roof, causing damage to the shingles or even puncturing holes. Ensure that you trim any branches that are close to your roof or hire a professional to do it for you.
4. Fix Small Issues Early
If you notice any minor damage to your roof, such as a missing shingle or small crack, it is important to fix it right away to prevent further damage. Small repairs are relatively cheap and easy to do yourself, but if you are not comfortable doing it yourself, call in a professional.
5. Invest in Quality Roofing Materials
Investing in quality roofing materials can save you money in the long run. These materials are designed to withstand harsh weather conditions and wear and tear, which reduces the likelihood of future roof holes. Choosing a reputable brand and style that suits your climate and budget is key.
Although quality materials may be more expensive initially, they are worth it in the long run. They will last longer and need to be replaced less often, saving you money in repairs and replacement costs.
By following these tips and tricks for preventative maintenance, you can avoid future roof holes and ensure the longevity of your roof. Remember, small repairs and maintenance will save you money in the long run. So, take care of your roof and it will take care of you.