
Understanding the Problem: The Science Behind Lava Lamps
If you’re reading this article, chances are you are experiencing what many Lava Lamp owners have gone through at some point; an issue with your Lava Lamp’s bubbling mechanism. Whether the lights come on but the wax doesn’t bubble, the wax gets stuck at the top, or the wax sinks to the bottom and doesn’t rise, the issues that can arise when trying to enjoy these trendy lamps vary greatly. Understanding the problem is the first step in figuring out how to fix it, and that starts with the science behind Lava Lamps!
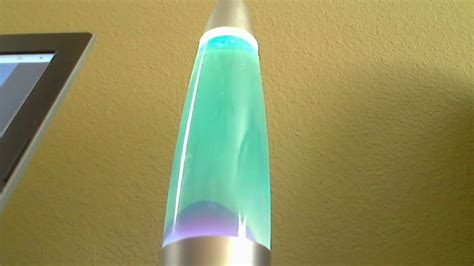
The Lava Lamp is a relatively simple invention, but it is one that captivates both young and old. British inventor Edward Craven Walker came up with the idea in the 1960s, and it immediately became a popular decoration for homes and offices around the world. The mesmerizing blend of wax and colored liquid that bubbles and moves around in its glass tube captures the imaginations of everyone who sees it. However, to get your Lava Lamp to work properly, you must first understand the science behind its operation.
The working principle of a Lava Lamp is based on two fundamental scientific concepts; density and heat transfer. The glass bottle of the Lava Lamp is filled with a colored liquid, typically water or mineral oil, and wax that is melted by the heat generated by a lightbulb inside the base of the lamp. As the wax melts, it becomes less dense than the surrounding liquid and floats upwards. As it does, it cools and begins to solidify again, becoming denser and sinking back down to the bottom of the bottle.
The magic of the Lava Lamp happens when the wax and liquid reach an equilibrium. The heat from the lightbulb ensures that the wax is always just above the point of solidification, allowing it to continually cycle through the rising and sinking phases that create the beautiful globules and patterns most synonymous with Lava Lamps. It is essential to keep in mind that the lamp’s optimal performance is directly related to how well the science of heat transfer and density are working together.
While the science of a Lava Lamp may seem simple in theory, it’s essential to remember that many variables can affect the lamp’s performance. Pairing the wrong bulb wattage with the size of your Lava Lamp is often the culprit for unsuccessful bubbling. Incorrect bulb wattages can cause the wax to melt too quickly, leading to dangerously high temperatures and causing the wax to separate into small pieces. Another common mistake many people make is not allowing the lamp enough time to warm up. Several factors, such as room temperature and the lamp’s size, can take longer to get the wax in motion, so it pays to have a bit of patience.
So there you have it, an overview of the science behind the Lava Lamp and how it affects performance. Armed with this knowledge, you’re now ready to tackle troubleshooting your Lava Lamp properly.
Checking for Common Issues: Examining the Lamp’s Components
Now that you have taken the time to look at the bulb, it’s time to examine the rest of the lamp. To get started, make sure the lamp is unplugged and entirely cool. You wouldn’t want to burn yourself or damage any of the components while inspecting the lamp.
To begin the examination, carefully take out the bulb. Inspect the small glass tube at the bottom of the lamp that’s responsible for heating the wax to create the bubbly effect. If you see any cracks or breakages, it’s time to replace it. You can usually get a replacement from the manufacturer or visit a hardware store to find the right match.
Next, take a look at the wax. Has it formed a layer on the side of the glass? If so, use a FLAT tool to scrape off the wax and push it back into the center where the heat is well-distributed. This will ensure that the wax can melt evenly and bubble again. Avoid using sharp objects as they might scratch the glass.
Another component to examine is the base. Check its power cord, plug, and switches. If you think there is something broken, safe to have a professional fix loose wires or replace the switch. Sometimes switches fail due to repeated use, and you need to have them replaced to bring your lamp back to life.
While inspecting the lamp’s components, spend some time looking at the lava’s color and consistency. If they seem off, there may be a problem with the chemical makeup of the wax. In this case, you may need to empty out the wax and refill it with the right formula based on the manufacturer’s instructions. You want to avoid using wrong lava or wax because it can shorten the lamp’s lifespan or even cause fire hazard.
As you put back all the components, be sure to secure them in place. The bulb and glass tube should be appropriately screwed in to prevent wobbling when heated or if the lamp is accidentally bumped.
This examination of the lamp’s components is necessary to identify the root of the problem with your lava lamp. Most issues tend to be minor, but they can cause big headaches if left unresolved. By catching them early and taking the right steps, you can extend the lifespan of your lava lamp and enjoy it more for longer.
Troubleshooting Techniques: Adjusting the Heat Source and Liquid Consistency
So you’ve followed the first steps in troubleshooting and your lava lamp still won’t bubble. Don’t worry, there are a few more things you can try to revive your lamp.
1. Adjust the Heat Source:
If you’ve checked the bulb and your lamp still won’t work, try changing the placement of your lamp. Lava lamps work best at room temperature environments that are not too hot or cold. If the lamp is too cold, the wax won’t melt, or it will take longer to melt, hampering the lamp’s function. If the liquid gets too hot, it can become too fluid, creating bubbles that are too large that won’t move through the lamp. If possible, place your lamp in a sunlit spot and try to avoid drafty areas. If your lamp is still not working, try a different bulb that provides more heat.
2. Adjust Liquid Consistency:
If your lamp’s liquid has gotten too thick, it can also create problems. Thick and sticky lava may wobble, but it won’t rise and produce the beautiful display—changing the consistency of the liquid will help restore proper function. If the lava is too thick, add distilled water to the lamp’s container. Start with one tablespoon and add more gradually until you reach your desired consistency. You can also add drops of detergent or glue to the liquid, which will make the lava separate easier. Just a quick note, however, too much dishwashing detergent may prevent the lava from sticking together as it should and cause premature lava lamp death.
3. Get a Spare Part:
If all the above tips have failed, it may be time to substitute the damaged part or discard the lamp entirely. Replacing the bottle or base or lava should resurrect the lamp from initial death. You can also locate a spare globe or wax insert for your specific lamp brand. If the bulb of the lamp has burned out, it may save the computer to take the bulb to the closest hardware store to locate a replacement. If all else fails, buy a new lamp and try again.
Now you’re prepared to troubleshoot your lava lamp when it won’t bubble. From adjusting the heat source to changing the liquid consistency, and lastly getting a spare part, these techniques should get your lamp back into shape. So, don’t get rid of your lava lamp just yet and give these tips a try before discarding the lamp.
Replacing the Bulb
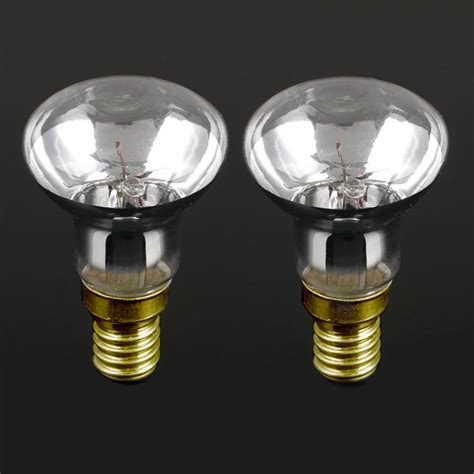
One of the simplest solutions to fixing a lava lamp that won’t bubble is replacing the bulb. First, make sure to unplug the lamp and let it cool completely before handling. Then, locate the portion of the lamp that houses the bulb. Most lava lamps will have a base that unscrews from the top, allowing you to access the bulb.
Using your hands or a pair of pliers, carefully remove the old bulb and replace it with a new one of the same wattage and size. Make sure the bulb is screwed in tightly and securely. Once the new bulb is in place, reassemble the lamp and plug it back in.
It’s important to note that if replacing the bulb doesn’t solve the problem, there may be an issue with another component in the lamp.
Replacing the Wax
If you’ve replaced the bulb and your lava lamp is still not bubbling, the next issue could be the wax. Over time, the wax in a lava lamp can become cloudy or dirty, making it unable to move freely and form bubbles.
First, once again, unplug the lamp and let it cool fully before handling. Then, turn the lamp upside down and let the old wax slowly drain out into a container. Be careful not to shake the lamp or cause any movement that could damage the lamp.
Then, refill the lamp with new wax, making sure to fill the lamp to the appropriate level as specified in the instructions.
If the wax is not the issue, there could be a problem with the lamp’s heating element or coil. If you’re unsure how to address these issues, it’s best to consult a professional or reach out to the manufacturer for guidance.
Checking the Heating Element
The heating element of a lava lamp is responsible for warming the wax so that it can flow and form bubbles. If the heating element is not functioning properly, the wax will not heat and bubble.
To check the heating element, unplug the lamp and let it cool completely before handling. Then, unscrew the top of the lamp and access the heating element. This is typically a metal coil that runs through the center of the lamp.
Check the coil for any signs of damage or wear. If the coil appears to be damaged, it will need to be replaced. If the coil looks intact, try cleaning it with a soft cloth. Dirt or debris can sometimes build up on the coil and prevent it from functioning properly.
If the heating element is not the issue, there may be a problem with another component of the lamp.
Replacing the Base
In some cases, the issue with a non-bubbling lava lamp may be with the base of the lamp. The base holds all the electrical components of the lamp, and if there is damage or a malfunction in this area, the lamp will not work correctly.
To replace the base, first, unplug the lamp and allow it to cool fully. Then, remove the top of the lamp by unscrewing it, exposing the electrical wiring. Carefully disconnect the wiring from the base of the lamp.
Next, unscrew the base from the lamp and replace it with a new one. Be sure the new base is compatible with your lamp model.
Once the new base is securely in place, reconnect the electrical wiring as it was before. Reassemble the lamp and plug it back in.
If the base replacement does not fix the problem, it’s possible there could be an issue with another component in the lamp.
By following these tips and tricks, you can take the matter into your own hands and fix your non-bubbling lava lamp. Whether you need to replace the bulb, refill the wax, check on the heating element, or replace the base, these DIY fixes will help you reach those bubbly results you desire. Remember to always take safety precautions and disconnect and cool down the lamp before handling.
Seeking Professional Assistance: When to Take Your Lava Lamp to the Experts
If you have tried all the troubleshooting tips and the lava lamp is still not bubbling, then it’s time to consider seeking professional assistance. Here are some situations when it’s best to take your lava lamp to the experts:
- When the Lava Lamp is Still Not Working After Trying All Troubleshooting Tips
- When the Lava Lamp is Under Warranty
- When You’re Not Comfortable Fixing the Lamp Yourself
- When the Lamp is an Antique or Collectible Item
- When the Lamp is Custom-Made or Unique
If you have tried all the tips we provided and the lamp still isn’t working, then it’s best to seek professional help. The problem could be with the bulb or the heating element, and these parts may need to be replaced. A professional will be able to diagnose the problem and give you a better idea of what needs to be done.
If your lamp is still under warranty and it’s not working, then you’re better off taking it to the manufacturer’s authorized service center. Trying to fix the lamp yourself or going to a third-party service center may void the warranty. Make sure to keep the receipt and the warranty card handy when taking the lamp for repairs.
If you’re not comfortable using tools or opening up the lamp, then it’s best to let the professionals handle it. Attempting to fix the lamp yourself could damage it further, causing permanent damage or rendering it unsafe to use. A professional will have the experience and tools necessary to get the job done quickly and easily.
If you have an antique or collectible lava lamp that isn’t working, then it’s best to take it to a specialist. Ordinary repair shops may not have the knowledge or experience to repair vintage lamps. A specialist will be able to fix the lamp without damaging its originality or value.
If your lamp is custom-made or unique, then it’s best to take it to the person who made it. DIY lamps or custom-made lava lamps may require expert knowledge and experience to fix. The person who made the lamp will know exactly how it works and how to repair it if there are any issues.
Remember, if you’re unsure about anything, don’t hesitate to ask for help. Attempting to fix a lava lamp when you’re not comfortable doing so can lead to accidents or further damage to the lamp. Better safe than sorry!