
Understanding the Basics of a Tubeless Tire
A tubeless tire is a type of tire that does not require an inner tube to hold the air pressure. The air stays in the tire with the help of the tire’s sidewalls, which form an airtight seal between the tire and the rim. This seal is created by using different types of materials such as special chemical agents, tapes, rubber gaskets, and adhesives.
Before repairing a tubeless tire on your lawn mower, it’s important to understand the basic anatomy of the tire. The tire is made up of outer rubber, cushion layers, steel belts and inner liner. The steel belts are used to reinforce the tire and provide excellent tread wear, while the inner liner helps keep the air pressure confined to the tire and offers another layer of protection. The tire cushion provides a smoother ride and helps absorb shocks while the outer rubber in the tire is designed to protect it from wear and tear caused by roads and terrain. The beads of the tire grip the rim, allowing the tire to rotate.
One major advantage of a tubeless tire is that if you get a puncture or a leak in the tire, the air will escape much slower than a tire with an inner tube. This allows the operator to drive their lawn mower with a slow leak until they can repair the tire. Another advantage of tubeless tires is that they provide a smoother ride since you won’t have to deal with the constant thumping caused by an inner tube.
If you are fixing a tubeless tire on your lawn mower, it’s important to look for certain types of damage such as punctures, cracks, and leaks. Punctures can be caused by debris on the road, and cracks can result from exposure to harsh weather elements such as sun, rain, and snow. When you’re looking for a leak, put the tire in a tub of water and watch for bubbles. If you see bubbles, that indicates a leak.
It’s important to note that a tubeless tire may be fixed using a variety of materials, including rubber cement and patches that are specifically designed for use on tubeless tires. When fixing a tubeless tire, it’s important to clean the area with soapy water and remove any debris or dirt that may interfere with the repair process.
In conclusion, understanding the basics of a tubeless tire is essential before fixing it on your lawn mower. It’s important to check your tire for any damage, such as punctures, cracks, and leaks, and to clean the area before repairing it. With a little bit of knowledge and some basic tools, you can easily fix a tubeless tire and set your lawn mower back on track.
Identifying the Cause of the Flat Tire

There are several reasons why a tubeless tire on a lawn mower may go flat. The most common reason is a puncture caused by a sharp object such as a nail or thorn. Another reason is a damaged or worn-out valve stem that no longer holds air. Finally, a leaking bead seal between the tire and the rim can cause air loss. It’s important to identify the cause of the flat tire before attempting to fix it, as this will help you determine the best course of action.
If you suspect a puncture, start by inspecting the tire for any visible signs of damage. Look for objects such as nails, screws, or shards of glass that may have penetrated the tire. Check both the outer and inner surfaces of the tire, as well as the sidewalls. If you find a puncture, mark the spot with a piece of chalk or a marker so that you can locate it easily later.
If you don’t see any obvious signs of damage, move on to checking the valve stem. This is the small rubber piece that protrudes from the rim and allows air to enter the tire. Check the valve stem for any signs of cracking or damage, and make sure it’s securely attached to the rim. If the valve stem is damaged, it will need to be replaced.
If the puncture and valve stem are both intact, the next step is to check the bead seal. This is the area where the tire fits onto the rim. Look for any debris, rust, or dirt that may be preventing the tire from making a good seal with the rim. Clean the area thoroughly and inspect it for any signs of damage. If the bead seal is damaged, it may need to be repaired or replaced.
Once you have identified the cause of the flat tire, you can move on to fixing it. If it’s a puncture, you can usually repair it with a tire repair kit that includes a plug and a reamer. If the valve stem is damaged, it will need to be removed and replaced with a new one. If the bead seal is damaged, it may be possible to repair it using a bead sealer or it may need to be replaced.
It’s important to note that some tubeless tires cannot be repaired and must be replaced entirely. This is often the case if the damage is too extensive or if the tire is too old and worn out. If you’re not sure whether your tire can be repaired, it’s best to consult with a professional.
In conclusion, identifying the cause of a flat tire on a lawn mower is crucial to repairing it correctly. Whether it’s a puncture, a damaged valve stem, or a leaking bead seal, taking the time to diagnose the problem will save you time and money in the long run. With the right tools and a bit of know-how, you can fix your flat tire and get back to mowing your lawn in no time.
Removing the Tire from the Lawn Mower
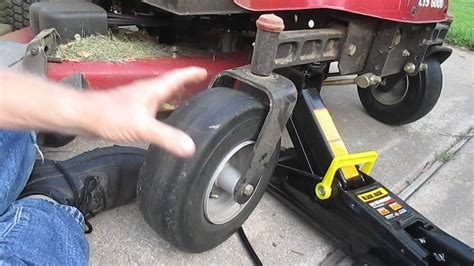
Repairing a tubeless tire on a lawn mower is not a rocket science job; you can do it all by yourself by following some easy steps. The first step of fixing a tubeless tires is removing the tire from the lawn mower.
Before tackling the removal process, ensure that the lawn mower is parked on a level surface and turned off. Then, check the tire and remove any debris that might be caught between the rim and tire. This is crucially important because any foreign object can damage the new tire once it is installed.
Next, release all the air from the tire. Do this by using a valve core remover (a small tool that helps to unscrew the valve core from the valve stem). It is crucial to deflate the tire before proceeding with the removal process. Deflating the tire makes it easier to remove and less dangerous, given that tubeless tires are designed to hold air under high pressure, and if not carefully handled, they can cause bodily harm.
After deflating the tire, break the tire bead by inserting a tire iron or bead breaker between the rim and tire. This process can be done using two tire iron tools. Place the tools at equidistant intervals and pry them downward simultaneously. This will break the tire’s bead, which will enable you to remove the tire from the rim.
Once you have successfully broken the bead, tilt the lawn mower on its side so that you can easily remove the flat tire. Remove the tire by gently pulling it away from the rim. Be sure to use both hands for coordination. Work the tire out from the rim bead by pressing the tire’s sidewalls with your thumbs. If the tire resists removal, tap its sidewalls with a rubber mallet gently. Alternatively, you can use a pry bar to gently work your way around the rim’s circumference until the tire comes off entirely.
After removing the tire, clean the rim’s surface using a wire brush or sandpaper. This step is for removing all debris or rust and ensures that the rim’s surface is smooth and ready for installation of a new tire.
In conclusion, removing the tire from a lawn mower is necessary to access the punctured area and install a new tire. Following the steps above will enable you to remove the tire from the rim safely. Be sure to exercise caution, and always have the proper tools to get the task completed correctly and efficiently.
Repairing the puncture in the tire
If you have a punctured tubeless tire on your lawn mower, no need to worry because the repair is simple and you can do it yourself. The following steps will guide you on how to fix the puncture.
1. Before repairing the tire, switch off the machine and remove the tire from the lawn mower.
2. Next, locate the puncture and mark it with a pen, this will guide you during the repair process.
3. Clean the puncture area with rubbing alcohol and let it dry completely. This is important because any moisture in the area can interfere with the repair process.
4. Now it’s time to fix the puncture. To start off with, thread the reamer tool from your tire repair kit into the puncture to clean it up and also to create a smooth channel for the plug to go in.
5. Once you have reamed the puncture hole, take the insertion tool also from your repair kit and thread in a plug. It should be covered in rubber cement, giving the patch a sturdy grip as you insert it into the puncture canal.
6. Push the plug into the hole until it’s level with the surface of the tire. Cut off any excess plug remaining using a sharp blade, making sure that it is flush to the tire surface.
7. Once you’ve inserted the plug, let the rubber cement dry for a few minutes, then make sure to assess the effectiveness of the repair. Inflating the tire can help detect if air is still escaping from the hole, causing the plug to fail.
When doing this repair, you must make a conscious effort to handle your tire with care. Unlike standard tires, tubeless tires are less flexible and more prone to breaking. If you apply excessive pressure, it may cause them to crack, which would only add to your list of repair requests.
After the repair has set in place, you can reinflate the tire and put it back on the lawn mower. It’s important to always have a tire repair kit in your garage, and be sure you know how to use it because a tire puncture can happen at any time.
Overall, repairing a punctured tire on a lawn mower isn’t as tough as it may seem. With these simple steps, you can do it yourself, save time, and money. Just be careful not to compromise the tire’s structure and follow the steps given for a repair that lasts longer.
Re-installing the tire on the lawn mower
Once you have fixed your tubeless tire, you will need to reinstall it on your lawn mower. Here are the steps that you need to follow to do this:
Step 1: Clean the tire bead and rim seat
Before reinstalling the tire, make sure the tire bead and rim seat are clean. Use a wire brush to remove any dirt or debris that might interfere with tire inflation, and use a clean, dry rag to wipe away any remaining debris or moisture. This will ensure that the tire will seat properly on the rim and will inflate to the appropriate pressure.
Step 2: Position the tire on the rim
Place the tire on the rim in such a way that the tire valve is in the correct position to allow you to inflate it later. Then, working your way around the tire, use your thumbs to push the tire bead onto the rim. This will require some force, so be sure to use a tire lever if needed to avoid damaging the tire or the rim.
Step 3: Inflate the tire
Next, you will need to inflate the tire. Be sure to follow the manufacturer’s instructions for the appropriate tire pressure. Once you have inflated the tire, check to make sure it is seated properly on the rim and does not have any visible leaks.
Step 4: Check for leaks
After inflating the tire, check for any leaks by spraying the tire with soapy water. If bubbles form, this indicates that air is escaping from the tire. If this happens, reduce the pressure, remove the tire from the rim, and check the seating of the tire bead as well as the valve and valve seal. Repeat the process of inflating the tire and checking for leaks as needed.
Step 5: Install the tire on the lawn mower
Once you have checked for leaks and confirmed that the tire is properly seated on the rim, you can install the tire on the lawn mower. Simply slide the hub and axle through the center of the tire, and make sure that the lug bolts are tightened securely. Be sure to test the tire by driving the lawn mower slowly at first, and then gradually increasing speed until you are confident that the tire is securely in place.
By following these simple steps, you can reinstall the tire on your lawn mower with confidence and keep your lawn in great condition all season long.