
Understanding Burnt Coils in Vaping
When you vape, the coils in your vaping device heat up the E-liquid and create the vapor that you inhale. However, over time, these coils can become burnt, leading to a less-than-pleasant vaping experience. But what exactly causes burnt coils, and what can you do to fix them?
Contents
What causes burnt coils?
There are a few different factors that can lead to burnt coils in vaping. The most common cause is simply using your vaping device too much. When you vape extensively, the coils can overheat and become damaged, which can cause a burnt taste in the vapor. Similarly, if you vape at too high of a wattage or voltage, you may also overheat your coils and cause damage.
Another factor that can lead to burnt coils is coil gunk. This is when residue from your E-liquid builds up on the coils, making it harder for them to heat up properly. When the coils can’t heat up enough, they can become damaged and produce a burnt taste.
How do you fix burnt coils?
If you’re experiencing a burnt taste in your vapor, the first thing you should do is check your coils. If they look dark or burnt, you may need to replace them. However, if they look fine, you can try a few different techniques to fix them.
One option is to clean your coils. You can use a cotton swab or other cleaning tool to remove any gunk or residue that may be building up on the coils. This can help your coils heat up more efficiently and get rid of the burnt taste.
Another option is to adjust your wattage or voltage. If you’ve been vaping at a high setting, try turning it down a bit and see if that helps. You may also want to experiment with different wattage or voltage settings to find the sweet spot that produces the best flavor without burning your coils.
If neither of these techniques work, you may need to replace your coils. When you do replace them, make sure you choose high-quality coils that are designed for your specific vaping device. This can help prevent future burnt coil issues and give you a better vaping experience overall.
Preventing burnt coils
Of course, the best way to fix burnt coils is to prevent them from happening in the first place. To do this, make sure you’re using your vaping device correctly and not vaping too much or at too high of a wattage or voltage. You should also regularly clean your device and coils to prevent any gunk buildup.
Finally, invest in high-quality coils that are designed to last. Cheaper coils may be more prone to burning, which can lead to a less-than-stellar vaping experience. With the right care and maintenance, you can keep your coils in great shape and continue to enjoy the smooth, flavorful vapor that vaping has to offer.
Step-by-Step Guide to Fixing a Burnt Coil: Replacing the Coil Head
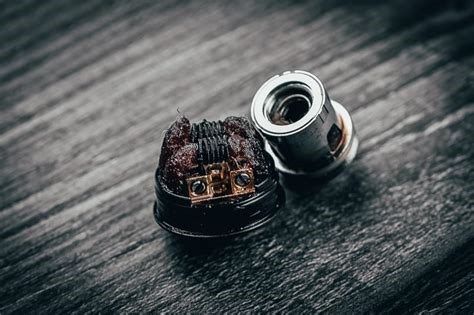
One of the most common reasons for a burnt coil is an old or worn-out coil head. The coil head is the small wires that are wrapped around a cotton or mesh material. The coil head heats up the e-liquid to create the vapor you inhale. Over time, the coil head can become gunked up with old e-liquid, causing it to burn out and taste unpleasant. Replacing the coil head is a straightforward process and can often fix the problem of a burnt coil.
Step 1: Before you start replacing the coil head, make sure that your e-cigarette is turned off. This will prevent any accidents from happening while you work on it.
Step 2: The next step is to remove the tank from your e-cigarette. If you are unfamiliar with how to do this, consult the user manual that came with your device. Usually, the tank will unscrew from the base of the e-cigarette.
Step 3: Once you have removed the tank, you will see the coil head. If your tank is reusable, you may need to remove the old coil head from the tank. Some tanks have coil heads that are screwed onto the base of the tank, while others simply pull out.
Step 4: Take the new coil head and attach it to the base of the tank. Make sure that it is securely attached.
Step 5: Once the new coil head is securely in place, you can reattach the tank to the base of the e-cigarette. Make sure that it is tightened properly to prevent any leaks.
Step 6: Prime the coil head. This is an essential step that many people overlook. Priming the coil head means that you are saturating the cotton or mesh with e-liquid. Failure to prime the coil head can cause it to burn out quickly or even dry burn. To prime the coil head, simply add a few drops of e-liquid to the cotton or mesh material. Let it sit for a few minutes before taking a few drags from your e-cigarette without activating the fire button. This will allow the juice to soak into the cotton and prevent any burnt hits.
Step 7: Finally, you can turn on your e-cigarette and start vaping. It is recommended that you start with a low wattage or temperature setting to allow the new coil head to break in and prevent any burning. Gradually increase the wattage or temperature until you reach your desired vaping experience.
In conclusion, replacing the coil head is a simple and effective solution to fixing a burnt coil. Make sure to prime the coil head properly and start at a low wattage or temperature to prevent any burning. With a new coil head, your e-cigarette will taste fresh and enjoyable again.
Tips for Preventing Burnt Coils
If you’re an avid vaper, you know that a burnt coil can ruin your experience with e-cigarettes. Your device simply won’t perform the same – it will either produce less vapor, less flavor, or it will stop working altogether. Not to mention, constantly replacing burnt coils can become expensive and time-consuming. The good news is that there are several things you can do to prevent this from happening in the first place. Here are a few tips for preventing burnt coils:
1. Prime Your Coil
One of the most important ways to prevent burnt coils is by priming them properly before use. This prepares your coil to absorb e-liquid and helps prevent it from overheating and burning out. To prime your coil, simply saturate the wick material (usually cotton) with e-juice before you install it. You can do this by dripping a few drops of e-juice directly onto the cotton from the top of your atomizer, or by filling your tank and waiting a few minutes before vaping. This will help your coil last longer and perform better.
2. Vape at the Right Wattage Range
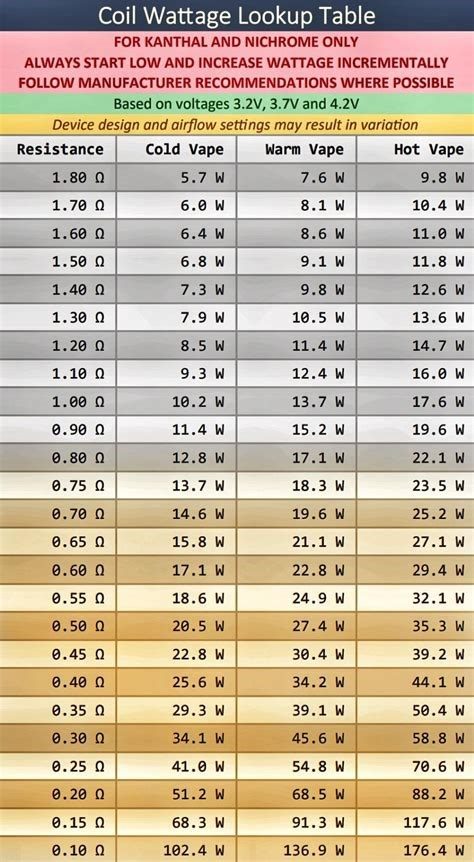
Another way to prevent burnt coils is by using a compatible wattage range. Each coil has a recommended wattage range, which you can find on the packaging or online. If you vape at a wattage that’s too high for your coil, it can overheat and burn out quickly. On the other hand, if you vape at a wattage that’s too low, you might not get the same amount of flavor or vapor production. Make sure to adjust the wattage on your device according to the recommended range for your coil, and start at a lower wattage if you’re not sure.
3. Keep Your E-Juice Topped Up

One thing that many vapers forget is to keep their tanks topped up with e-juice. When your e-juice runs low, the wick material can become burnt and dry. This can cause a burnt taste and eventually lead to a burnt coil. To prevent this, make sure to always keep your tank topped up with e-juice. You can also get into the habit of checking your e-juice level throughout the day to make sure it doesn’t get too low. This will help your coil last longer and prevent any burnt tastes from ruining your vaping experience.
4. Clean Your Tank Regularly

Finally, keeping your tank clean is another important way to prevent burnt coils. Over time, e-juice can build up inside your tank and cause clogs or blockages. This can lead to dry hits and burnt coils. To prevent this, make sure to clean your tank regularly by taking it apart and washing the individual components with warm water. You can also use a small brush or toothbrush to remove any stubborn residue. By keeping your tank clean, you’ll ensure that your coils continue to perform at their best.
By following these tips, you can prevent burnt coils and enjoy a better vaping experience. Remember to prime your coil, vape at the right wattage, keep your e-juice topped up, and clean your tank regularly. With these simple steps, you’ll save money and time in the long run.
Choosing the Right Coil for Your Vaping Style
One of the most important factors in avoiding burnt coils is choosing the right coil for your vaping style. Coils come in a variety of materials and coil types, each designed to cater to different vaping preferences. Here are some of the most popular coil types and their recommended uses:
1. Kanthal Coils
Kanthal coils are some of the most common coil types used in vaping. They are made from a combination of iron, chromium, and aluminum, which makes them highly resistant to heat and oxidation. Kanthal coils are best suited for standard wattage vaping, and are compatible with both variable wattage and temperature control mods.
2. Stainless Steel Coils
Stainless steel coils are versatile and can be used in both wattage and temperature control modes. They are made from an alloy of stainless steel and nickel, which makes them highly resistant to heat and corrosion. Stainless steel coils are known for their fast ramp-up time and crisp flavor delivery.
3. Nickel Coils
Nickel coils should only be used in temperature control mode, as they are highly sensitive to changes in temperature. They are made from pure nickel wire, which has a very low resistance and heats up quickly. Nickel coils are ideal for vapers who enjoy big clouds and intense flavor.
4. Titanium Coils
Titanium coils are similar to nickel coils in that they should only be used in temperature control mode. They are made from pure titanium wire, which has a lower resistance and better temperature control than nickel. Titanium coils are best suited for vapers who enjoy a smooth, cool vape with great flavor.
5. Clapton Coils
Clapton coils are a popular type of coil for vapers looking for a more complex vaping experience. They are made from a combination of a thicker wire wrapped in a thinner wire, which creates a larger surface area for e-liquid to vaporize. Clapton coils are compatible with both variable wattage and temperature control modes, and are known for their intense flavor and huge clouds.
Choosing the right coil for your vaping style is key to avoiding burnt coils. Make sure to consider factors like material, coil type, and your preferred wattage or temperature control mode when selecting your coils. With the right coils and proper vaping technique, you can enjoy a smooth, flavorful vape without any nasty burnt tastes.
Troubleshooting Other Vaping Issues
While a burnt coil is one of the most common issues vapers encounter, it’s not the only one. Here are some other troubleshooting tips for the other vaping issues:
1. Weak Flavor
If your vape juice flavor seems weak, there could be a few reasons for this. Firstly, check that your coil is fitted correctly and is not burnt out. Also, check that your device is set to the correct wattage and temperature for your juice. If these don’t help, try switching to a different juice to see if the problem persists. If it does, you may need to clean your tank and coil to ensure that there isn’t any residue affecting the flavor.
2. Leaking Tank
If your vape tank is leaking, it can be frustrating and messy. One common reason for leaking is a damaged or worn o-ring or seal. Check these and replace them if necessary. Also, make sure that your tank is screwed on tightly, but not too tight that it causes any damage. If these don’t fix the issue, try disassembling your tank and cleaning it thoroughly to remove any e-liquid residue.
3. Harsh Hits
If your vape hits are too harsh, it could be because of a few things. Check that you are using the correct coil and wattage for your device. If you’re using a higher PG e-liquid, switch to a higher VG one, as PG can sometimes cause throat irritation. Also, ensure that your tank is free from any leaks as this can cause air to enter the system and cause harsher hits.
4. Battery Life Draining Quickly
If your battery is draining quickly, it could be because the wattage on your device is too high for the battery’s capacity. Try decreasing the wattage for better battery life. Also, ensure that you’re using a charger specific to your device and that you’re not charging it overnight or for prolonged periods, as this can damage the battery life.
5. Gurgling Sounds from Tank
If you’re hearing gurgling sounds coming from your tank, it could indicate that too much e-liquid has flooded the coil. This can be caused by overfilling the tank, inhaling too deeply, or swapping coils without emptying the tank. To fix this issue, remove the coil and gently blow through it to clear out any excess e-liquid. Alternatively, try taking shorter, gentler inhales to avoid flooding the coil.
By troubleshooting and fixing the other vaping issues, you can ensure that you’re getting the best vaping experience possible, without any pesky problems getting in the way.