
Identifying the Greenhouse
If you’re playing Stardew Valley, you’ve likely come to appreciate the benefits of a greenhouse. With its ability to produce fruit and vegetables all year round, the greenhouse can be a real game-changer. However, what do you do if your greenhouse becomes damaged or falls into disrepair? Fixing the greenhouse can be a bit tricky, especially if you’re new to the game. However, with a bit of know-how, repairing your greenhouse can be done in no time.
First, you need to identify where the greenhouse is located on your farm. To find it, you’ll need to have a farm that is at least level four. When your farm reaches that point, you’ll receive a letter from JojaCorp, a local business in Pelican Town. The letter will say that JojaCorp has gone out of business, and the deed to an abandoned greenhouse on your farm was discovered.
Once you receive the letter, head to the upper left corner of your farm. There, you’ll find the abandoned JojaMart. The greenhouse is located behind the building. A door on the side of JojaMart will lead you directly to the greenhouse. If you haven’t unlocked the community center yet, the inside of the greenhouse will be in bad shape, with broken glass all over the place. If you have unlocked the community center, the greenhouse will be fully repaired, with no glass shards in sight.
It’s worth noting that repairing the community center will also repair the greenhouse. If you’ve opted to side with JojaCorp instead, you can still repair the greenhouse. However, it will be a bit more expensive. JojaCorp will sell you a Joja membership subscription, which will allow you to purchase greenhouse repair services. The fee for the membership subscription is 5,000 gold, which is quite steep, especially for early-game players. Once you have the membership, you can purchase the greenhouse repair service for 35,000 gold. For those on a budget, it might be best to stick with the community center.
In conclusion, identifying the greenhouse in Stardew Valley is the first step to repairing it. Once you have found it, you can repair it in a couple of ways, either by restoring the community center or purchasing a Joja membership subscription and paying for the greenhouse repair service. Regardless of the method you choose, having a functional greenhouse is well worth it in the end.
Choosing the Right Tools
One of the most important things to consider when attempting to fix your greenhouse in Stardew Valley is choosing the right tools for the job. In order to successfully repair any damage or issues that arise, you’ll need to have the right items on hand. Here are a few of the most essential tools to keep in mind:
- Hammer: A hammer is a versatile tool that can be used to repair most structural damage to the greenhouse. You’ll want to have a high quality hammer with a sturdy head and handle in order to get the most use out of it.
- Nails and Screws: Depending on the type of damage your greenhouse has sustained, you may need to use nails or screws to hold pieces in place. Having a variety of sizes and lengths on hand will help you ensure that you have the right hardware for the job.
- Duct Tape: Though it may not be the most elegant solution, duct tape can be extremely effective in patching holes or other issues in the greenhouse. Be sure to choose a strong, weather-resistant type that will hold up under the constant exposure to moisture and temperature fluctuations that the greenhouse experiences.
- Pruning Shears: In some cases, damage to the greenhouse may involve the plants themselves, such as broken branches or overgrowth. Pruning shears can help you trim back any excess growth and keep your plants healthy.
- Caulking: If you notice any gaps or holes in the greenhouse that are causing drafts or letting in pests, caulking can be an effective solution. Choose a type that is designed for use in high-moisture environments and that can handle temperature fluctuations.
By having all of these tools on hand, you can tackle a wide range of issues that may arise with your greenhouse. It’s also a good idea to have a basic tool kit available for any other repairs that may be necessary around your farm.
Repairing Cracks and Holes
Greenhouses are constructed primarily of glass or plastic material, which are prone to cracking and getting holes over time due to various reasons. The damage can often be costly and detrimental to the greenhouse’s efficiency in conserving heat and preventing pests from disrupting plant growth. However, fixing these cracks and holes in your greenhouse is an easy DIY project that requires minimal time and resources.
Here are some simple steps to repair cracks and holes in your greenhouse:
Contents
Step 1: Assess Damage and Gather Materials
Start by assessing the damage to the greenhouse. Identify the cracks and/or holes that need to be repaired and measure the width and length of each damaged spot. This information will help you determine the size of the materials you will need to complete the job. You will also need some basic materials such as a scraper, cleaning solutions, silicone caulk, or glazing tapes.
Step 2: Clean the Damaged Area
Next, clean the damaged area with a scraper and cleaning solution to remove any dirt, debris, or old caulking. This process helps ensure that the new materials adhere properly and bonds well to the surface of the greenhouse. When it comes to cleaning solutions, you can use any household cleaner that contains ammonia to clean and disinfect the area.
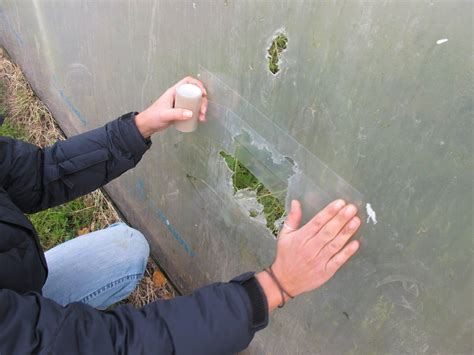
Step 3: Fill the Damaged Area
After cleaning, fill the damaged area with the appropriate filler material. If the damage is less than one inch, you can fill it with silicone caulking. However, for larger damage, you may need to consider using a glazing tape. Ensure that the filler material you choose matches the color of your greenhouse and fits well into the damaged area.
Step 4: Apply Caulk or Glazing Tape
Once the damaged area is filled with the appropriate material, apply the silicone caulking or glazing tape onto the surface of the area. Ensure that the tape sticks firmly to the surface of the greenhouse. Caulking should be applied to create a uniform layer to cover the damaged area and the filling substance beneath it. Use a caulking gun to ensure a smooth, even application.
Step 5: Smooth the Surface
After application, use a putty knife or your finger to smooth the surface of the caulk, make sure it fits snuggly, and fills up the damaged area. This process ensures that there are no air bubbles or cracks in the applied substance that might cause future damage. Finally, wipe off any excess material off the surface with a damp cloth and let it dry for at least two hours before introducing plants into the greenhouse.
By following these simple steps, you can be sure to effectively repair cracks and holes in your greenhouse without encountering any issues. Regular greenhouse maintenance will help you ensure plant growth efficiency, saving you time and resources in the long run.
Replacing Broken Glass panes
The greenhouse in Stardew Valley can produce crops year-round, which is why it’s important to keep it in good repair. One of the most common problems greenhouse users encounter is broken glass panes. These can occur due to a variety of reasons, including hailstorms, winter freezes, and player mishaps. Fortunately, repairing or replacing a broken glass pane is an easy task that can be done at home with the right tools.
The first step in replacing a broken glass pane is to remove the old one. This can be done by carefully prying the edges of the pane away from the frame using a putty knife or other tool. Once the edges are loose, gently push the glass pane out of the frame and set it aside. Be careful not to break the pane further, as small shards of glass can be dangerous to handle.
Once the old glass pane has been removed, it’s time to measure the size of the new pane needed to replace it. Take careful measurements of the length and width of the opening in the frame, and add an additional 1/4 to 1/2 inch to each measurement to account for the thickness of the putty or other material that will hold the new pane in place. Be sure to write these measurements down so they can be taken to the hardware store to purchase the new pane.
With the measurements in hand, it’s time to head to the hardware store to purchase the new glass pane. Be sure to get a pane that matches the thickness and type of glass used in the original. Once the pane has been purchased, take it home and clean it thoroughly. It’s important to remove any dirt, dust, or debris from the pane to ensure that it adheres correctly to the frame.
Next, apply a new layer of putty or glazing compound to the frame where the new pane will be installed. This material will help hold the pane in place. Gently press the pane into the frame, being careful to ensure that it is level and centered. Use a putty knife or other tool to press the putty or compound around the edges of the pane, creating a seal between the pane and the frame. Smooth out any excess putty or compound so that the seal is even and neat.
Finally, allow the putty or compound to dry completely before cleaning the pane and the frame. This may take several hours or overnight, depending on the type of material used. Once the putty or compound is dry, use a razor blade or other tool to carefully trim away any excess putty or compound that extends beyond the edges of the frame. This will provide a neat, finished look to the repair.
By following these simple steps, greenhouse users can easily repair or replace a broken glass pane in their structure. It’s important to keep in mind that safety should always come first when working with broken glass, so wear gloves and eye protection to avoid injury. With a bit of care and attention, any greenhouse can be kept in good repair, producing fresh, healthy crops year-round.
Cleaning and Maintaining the Greenhouse
If you’re a seasoned Stardew Valley player, you know how important it is to maintain your greenhouse. Not only does it provide you with a range of crops year-round, but it can also be a source of income if you have a steady supply of high-value crops. To keep your greenhouse thriving, you need to clean and maintain it regularly.
1. Clear out old crops: Before you start cleaning, remove old crops from your greenhouse. This will make cleaning much easier. You can either sell these crops or use them for cooking, depending on their value. Keep in mind that some crops, like ancient fruit and coffee, regrow after you harvest them. You can rearrange your crops after you’ve finished cleaning.
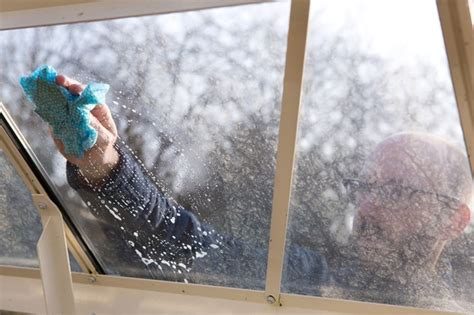
2. Clean the Glass: The glass in your greenhouse can get dirty quickly, especially if you have a lot of trees around it. You can clean the glass by using a mix of warm water and soap. Alternatively, you can use a commercial glass cleaner. Whatever you choose, make sure to wipe the glass down thoroughly. This will help prevent pests from getting into your greenhouse.
3. Check the Heating System: If you have an automatic heating system in your greenhouse, check it regularly to ensure it’s working correctly. You don’t want your crops to freeze, especially during the winter months. If your system isn’t working correctly, consider calling a repairman to fix it for you.
4. Inspect for Pests: Pests can wreak havoc on your greenhouse if left unchecked. Check your plants regularly for signs of pests, such as holes in leaves or insect infestations. If you find any pests, remove them manually or use an insecticide. Be sure to follow the instructions carefully.
5. Water the Crops: Your crops need water to survive, and it’s up to you to ensure they get enough of it. The amount of water needed will depend on the type of crop you’re growing and the time of year. Generally, you should water your crops at least once a day. You can do this manually or set up an automatic watering system.
If you’re manually watering your crops, be sure to use a watering can. Don’t use your hoe to water them, as this can damage the plants. You should also avoid watering your crops during the hottest part of the day, as this can scorch the leaves.
Cleaning and maintaining your greenhouse may seem like a lot of work, but it’s essential if you want your crops to thrive. By following these tips, you can keep your greenhouse in top condition all year round.