
Understanding the RB Button on Xbox One Controller
If you’ve been playing games for an extended period, you likely already know that the Xbox One controller has a total of four shoulder buttons or bumpers, located on the top of the controller. The bumpers are labeled “LB” and “RB” in all caps, to help distinguish them from the triggers, which sit below. In this article, we’ll examine specifically the RB or Right Bumper and how to fix it without having to get a new controller.
The RB button on the Xbox One controller is used to execute actions or movements in gameplay that might not readily fit on any other button or analog joystick. For example, pressing the RB button while in the game’s menus could let you switch between tabs. In games like shooter or racing games, it might let you modify weapons, switch gears, or drift in and out of traffic.
Despite being useful, the RB button can cause issues over time or even quit working entirely. You don’t have to get a new controller every time this happens, though. Below are examples of how you can fix the RB button on an Xbox One controller:
Adjusting the RB Button
If the RB button on your Xbox One controller isn’t functioning well, the first thing you should do is adjust it. One of the primary reasons a button in a controller fails to work might be because it’s not appropriately aligned or calibrated, leading to the button sending or receiving the wrong inputs. You can follow the steps below to adjust the RB button:
Step 1: First, turn off your Xbox One console and remove the battery cover from the back of the controller.
Step 2: Remove the four Torx screws located under the battery compartment. You should use a Torx screwdriver to do this, but if one isn’t available, a small flathead screwdriver or knife can work just fine, but be extra careful not to damage the controller’s backbone while it’s open.
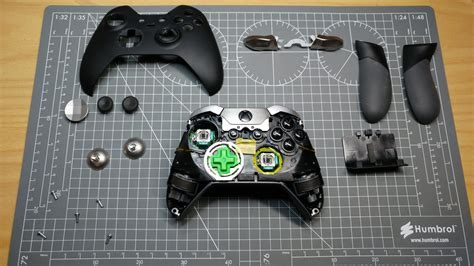
Step 3: After removing these screws, move the controller carefully to turn it over and pull apart the top half of the controller from the bottom half. Use a non-conductive tool to do this so that you don’t interfere with any internal components.
Step 4: Locate the RB button and adjust it by loosening or adding tension to the spring. You can do this by turning it to the right or left slightly. It’s recommended that you don’t overdo this when adjusting the spring because it can cause the button to become loose or too tight.
Step 5: Reassemble the Xbox One controller by rearranging the top and bottom parts around the gap connecting them, and then screw in the four Torx screws you removed in step 2.
Cleaning the RB Button
If the RB button’s issue is due to dirt buildup or contamination, cleaning it thoroughly can fix the problem. For example, if you consume snacks and drinks while gaming, debris from these items could accumulate around or near the button, leading to a malfunction. Cleaning the RB button steps could be:
Step 1: Shut down your Xbox One console and remove the battery cover from the controller.
Step 2: Spray a small amount of electronics spray cleaner or compressed air around the button’s surface to eliminate any dirt or debris.
Step 3: Use a tiny brush, a toothpick, or a non-conductive tool to clear out any remaining debris, being careful not to damage the controller’s circuits.
Step 4: Reassemble the controller and turn it back on.
Replacing the RB Button
If the previous steps don’t fix the RB button, it’s likely time to replace it. You can either take the controller to an expert to repair it or get an Xbox One controller replacement part and fix it yourself. The average price for a replacement RB button pad is around $10.
Replacing the RB button is not too difficult, but it involves a few steps. Remember that you perform these steps at your risk as you may end up damaging an even newer controller. A guide or video tutorial can help you, but the general steps include:
Step 1: Turn off the Xbox One console and remove the controller’s battery cover.
Step 2: Remove the four Torx screws located in the battery compartment.
Step 3: Separate the controller’s top section from the bottom section.
Step 4: Find and remove the RB button, which is glued to the controller’s motherboard.
Step 5: Place the new button pad and reassemble the Xbox One controller by putting the top piece and the bottom piece of the controller back together.
In Conclusion
Hopefully, this guide on how to fix the RB button on an Xbox One controller gave you insight on what to do when you have this issue. Don’t buy a new controller out of frustration when you can fix it or replace it in these simple steps. You should always remember to be careful while disassembling any electronic device. Happy gaming!
Troubleshooting Common RB Button Issues
If you are an avid gamer, you know how important your Xbox One controller is to your overall gaming experience. Unfortunately, like any other piece of tech, it can have its issues and the RB button is no exception. The RB button, or the right bumper, might stop responding or stick in place completely, which can be a frustrating experience. Fortunately, there are a few common fixes to try that might save the day.
1. Check for Physical Damage
The first thing that you should do if your RB button isn’t functioning as it should is to check for any physical damage. Examine the bumper and the edges surrounding it and see if there is any visible damage or debris. If you find anything in the button’s crevices or surrounding area, try to remove it with a dust cloth or a compressed air canister carefully. Additionally, check the trigger below the bumper as well, as this component can also cause issues sometimes. If you can’t find any physical damage or blockage, move on to the next step.
2. Open the Controller
If you have tried the above step and are still experiencing issues with your RB button, you may need to open up your Xbox One controller to access the inner workings. This can be a daunting task, but with the right tools and proper care, it can be done. You can find a precision screwdriver for this task at your local electronics store or purchase one online. Make sure to familiarize yourself with the process and watch tutorials before moving forward to avoid damaging your controller.
Once you have access to the inside of the controller, check the bumper and the areas surrounding it for any visible damage or debris that could be causing the issue. If you see any debris or dirt, clean it out with a soft brush. Additionally, check the connections between the bumper and the controller as they can often become loose over time. If you do find any visible damage, you may need to replace the bumper or another part of the controller.
When you have checked everything, put the controller back together and test the RB button. Hopefully, it should work as it should have been. However, if it doesn’t, you may need to replace the bumper entirely.
3. Replace the Controller
If all else fails, and you cannot resolve your RB button issue, you may have to consider replacing the controller entirely. While this might be the last resort, it can also provide the most definitive fix. If under warranty, you can contact Microsoft’s customer service to see if they can offer a solution – either a repair or an outright replacement. Otherwise, you can purchase a replacement controller from Microsoft or other authorized retailers in your area.
Remember, always be careful when opening up your controller and make sure to take your time to avoid damaging it further. With the right knowledge and tools, you can fix almost any issue with your Xbox One controller. Hopefully, these tips can help you resolve any problems you may be facing with your controller’s RB button.
DIY Fix for Loose or Stiff RB Button on Xbox One Controller
If you’re one of those who enjoy playing video games using an Xbox One controller, you know how frustrating it is when one of the buttons, particularly the RB (Right Bumper) button, is acting up. This button is essential when playing games that require shooting, attacking, or throwing an item. A loose or stiff RB button can make gameplay difficult, so it’s crucial to know how to fix it. In this article, we’ve gathered some tips on how to DIY fix the RB button on your Xbox One controller.
Contents
How to Fix a Stiff RB Button
If you notice that your RB button is too stiff, spraying some contact cleaner like WD- 40 or rubbing alcohol can help loosen the switch’s spring. Be sure to spray the cleaner on the sides of the button and let it dry for some time before you test it. If this doesn’t work, try using silicone spray instead. Apply the spray on the RB button spring with an injector. Use a toothbrush or a cotton swab to wipe the excess spray on the sides. Also, be sure to remove the batteries or disconnect the controller from the console before doing any cleaning.
How to Fix a Loose RB Button
A loose RB button, on the other hand, can be fixed by opening the controller’s top panel. Before you do this, make sure to unplug the controller from the console and remove the batteries. Use a screwdriver to remove the screws on the back panel. Set them aside and flip the controller. Carefully separate the top from the bottom panel and locate the RB switch. Remove the switch and push the tabs nearby. Also, check the button’s microswitch, which is responsible for pressing when you activate the button. Realign or replace it if it’s loose or faulty. Reassemble the controller and test it before screwing it back together.
How to Prevent the RB Button from Breaking Easily
Prevention is always better than cure. To keep your RB button healthy, here are some tips:
- Avoid pressing too hard on the button. Use a gentle touch instead.
- Don’t let young children use the controller unsupervised. Kids can be rough on the buttons.
- Clean your controller regularly. A build-up of dirt and grime can make buttons and triggers unresponsive or sticky.
- Invest in protective cases for your controller.
- If you play video games regularly, consider buying a second controller. This way, you can switch between controllers when one starts to malfunction.
You don’t have to spend money to buy a new controller when you can fix that loose or stiff RB button. With these DIY tips, you can save money and get back to your gameplay in no time. However, if you’re unsure about opening up your controller, it’s best to take it to a professional repair shop or Microsoft Service Center.
How to Replace the RB Button on Your Xbox One Controller
If you’re an avid Xbox One player, you understand the importance of having a functional controller. So, having a faulty RB button could be a real pain and significantly affect your gaming experience. The RB button on your Xbox One controller is one of the most frequently used buttons, and with time, it can become unresponsive or faulty. Sometimes the button may stick or not register clicks, hindering your gameplay and deteriorating your gaming experience. However, you don’t have to replace your entire controller; you can fix the RB button yourself.
Replacing the RB button on your Xbox One controller can be intimidating if you’ve never tried it before. However, it’s a straightforward process, and you can do it yourself efficiently with the correct tools and instructions. In this article, we’ll be showing you how to replace the RB button on your Xbox One controller.
Tools You’ll Need
Before you start, you’ll need to get these tools:
- A plastic opening tool
- A small Phillips screwdriver
- A new RB button
You can purchase these tools at any store that deals with gaming accessories or online.
Step by Step Guide to Fix Your RB Button
We understand that fixing your Xbox One controller may seem like a daunting task, but once you get the tools and follow our guide, it becomes pretty easy. Here are the steps to follow.
Step 1: Remove the Battery Pack
The first step is always to remove the battery pack from your Xbox One controller. This step is crucial as it prevents any electrical damage to the controller during the repair process.
Step 2: Unscrew the Controller
Once you’ve safely removed the battery pack, flip the controller upside down and remove the screws that hold the controller together using a small Phillips screwdriver. The screws are usually located on the upper part of the controller.
Step 3: Open up the Controller
Using the plastic opening tool, pry the casing apart from each other carefully. It’s essential to be gentle with this step as using excessive force can damage the controller’s circuit board. Work your way carefully around the controller until it opens up.
Step 4: Remove the Button Pad
Once you have the controller open, carefully remove the button pad that contains the RB button. Locate the RB button and gently remove it by pulling it away from its position. Be careful not to put too much pressure on it or bend it too much as that could damage the circuit board underneath it.
Step 5: Replace the RB Button
Take your new RB button and insert it into the space provided in the controller. Ensure that it clicks into position, signifying that it’s well secured. Reassemble the button pad and other controller components in a reverse order of how you disassembled them, starting by snapping the casing together.
Step 6: Test the Controller
After reassembling the controller, insert the battery pack and test the RB button. If the button clicks as expected, you have successfully replaced the RB button on your Xbox One controller. Congratulations!
Conclusion
Fixing your Xbox One controller’s RB button is a quick and easy process that you can do yourself if you have the correct tools and instructions. This guide has shown you step-by-step how to replace your RB button and enjoy your Xbox gaming experience once again. If your controller has more severe damage, it may be better to replace it entirely. However, with a bit of patience, you might be able to save yourself money and bring your device back to life.
When to Seek Professional Help for RB Button Problems on Xbox One Controller
If you’re having problems with your RB button on your Xbox One controller, you might be tempted to try and fix it yourself. However, there are times when seeking professional help might be the best option. Here are some situations where it might be worth considering getting expert assistance:
1. You’re not confident with DIY repairs
If you don’t have experience repairing electronics or you’re not confident with your DIY skills, trying to fix your controller yourself could end up doing more harm than good. You may end up breaking other parts of the controller, or you could even injure yourself. In this case, it’s better to leave the repairs to someone who knows what they’re doing.
2. You don’t have the right tools
Repairing your controller will require specific tools. If you don’t have the necessary tools, you may end up using the wrong ones, which could cause damage to your controller. A repair technician will have all the necessary tools to fix your controller quickly and efficiently.
3. You’ve already tried DIY repairs, and they haven’t worked
If you’ve already tried to fix your RB button and your controller still isn’t working correctly, the problem may be more complicated than you initially thought. In this case, it’s best to get professional help. A repair technician can diagnose the problem and fix it for you, preventing any further damage to your controller.
4. The controller is under warranty
If your controller is still under warranty, attempting to fix it yourself may void the warranty. If this happens, you’ll have to pay for any repairs needed out of your own pocket. If your controller is still covered by warranty, it’s best to contact the manufacturer or a licensed repair center to have it fixed.
5. You’re not sure what the problem is
If you’re not sure what’s wrong with your controller, trying to fix it yourself could make the problem worse. Instead, take your controller to a repair technician to have it diagnosed. They can tell you what’s wrong with the controller and how much it will cost to fix it. This way, you can make an informed decision about whether to repair the controller or replace it.
In conclusion, attempting to fix your RB button on your Xbox One controller can be tempting, but sometimes it’s best to seek professional help. Whether you’re not confident with DIY repairs, don’t have the right tools, or don’t know what’s wrong with your controller, a repair technician can help you get your controller working correctly again.