

Prerequisites for MySQL Installation
MySQL is an open-source relational database management system. It is crucial to make sure that the environment in which MySQL will be installed is compatible with the software. Before proceeding with the installation, there are several prerequisites that need to be fulfilled. In this article, we will discuss the prerequisites for MySQL installation.
The first prerequisite is to make sure that the server system being used supports MySQL. MySQL is compatible with most operating systems such as Linux, macOS, and Windows. To check for compatibility, the specifications of the server system should be in line with the system requirements of MySQL.
The second prerequisite is to check for any prior installations of MySQL on the server system. It is important to check if any version of MySQL has been previously installed on the server system before beginning the installation process. If there is an existing installation, it should either be uninstalled or removed before proceeding with the new installation.
The third prerequisite is to have administrative privileges on the server system. Administrative privileges are needed to make changes to the server system and to execute the installation of MySQL. The user account being used to install MySQL should have the necessary permissions to write to system directories and access system files.
The next prerequisite is to ensure that there is enough disk space on the server system. The disk space needed for MySQL installation depends on the configuration and expected usage of the database management system. It is important to have a minimum of 250MB of disk space available for the installation files. Additional disk space is needed for the database files, log files and backups.
The fifth prerequisite is to ensure that the server system has a sufficient amount of system memory. MySQL uses memory to cache data and to execute commands. The amount of system memory required depends on the database size, the number of users and the complexity of the queries. A minimum of 512MB of memory is needed to install MySQL. However, it is recommended to have at least 2GB of memory available.
The sixth prerequisite is to ensure that the server system has a reliable internet connection. A reliable internet connection is needed to download the installation files for MySQL. If the server system does not have a direct internet connection, the files can be downloaded on a different system and transferred to the server system through a USB drive.
In conclusion, MySQL is a widely used database management system. Before installation it is important to check the compatibility of the server system, remove any prior installations of MySQL, have administrative privileges, sufficient disk space and system memory, and a reliable internet connection. Fulfilling these prerequisites will ensure that the installation of MySQL is successful and the software runs smoothly.
Downloading and Installing MySQL
MySQL is a popular, open-source relational database management system that is used by developers all over the world. In this tutorial, we’ll show you how to download and install MySQL on your computer.
Before we begin, it’s important to note that there are different versions of MySQL available for download. For the purposes of this tutorial, we’ll be installing the Community Edition.
Here are the steps to download and install MySQL:
Step 1: Go to the official MySQL website at https://www.mysql.com/downloads/
Step 2: Scroll down to the MySQL Community Server section and click on the Download button.
Step 3: Choose your operating system from the list of available downloads. For example, if you’re using Windows, choose the Windows (x86, 64-bit), MSI Installer option.
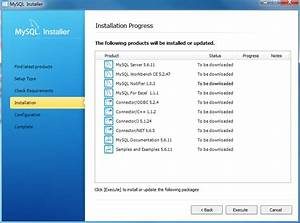
Step 4: Once the download is complete, double-click on the downloaded file to begin the installation process.
Step 5: Follow the on-screen instructions to complete the installation process. You may be prompted to choose a password for the MySQL root user during the installation process.
Step 6: Once the installation is complete, navigate to the MySQL installation directory to verify that it was installed correctly. The directory path will vary depending on your operating system. For Windows, the default installation path is C:\Program Files\MySQL\MySQL Server 8.0\bin.
Step 7: Open a command prompt window and navigate to the MySQL bin directory. Type the following command to connect to the MySQL server:
mysql -u root -p
You will be prompted to enter the password you set during the installation process. Once you’ve successfully logged in, you’ll be able to start using MySQL.
That’s it! You’ve successfully downloaded and installed MySQL on your computer. If you run into any issues during the installation process, consult the MySQL documentation for troubleshooting tips.
Configuring MySQL Server
Once you have successfully installed MySQL Server on your machine, the next step is to configure it. In order to make the most out of the database management system, it is important to properly configure MySQL Server for optimal performance and security. In this section, we will go over some important steps that you need to follow in order to configure MySQL Server.
The first thing you should do after installing MySQL is to run the MySQL Secure Installation wizard. This wizard will help you configure the root password and remove any default user accounts that may pose a security risk. The wizard will also ask you if you want to remove the anonymous user account and disallow remote root login. It is recommended to answer “yes” to these questions for added security.
After running the MySQL Secure Installation wizard, you should consider changing the default port (3306) that MySQL Server uses to something else. Changing the default port will make it harder for attackers to exploit any potential vulnerabilities in the system. You can change the port by editing the MySQL configuration file (my.cnf) and changing the port number.
Another important aspect of configuring MySQL Server is optimizing the server performance. There are several settings that you can adjust in the MySQL configuration file to improve server performance, such as the buffer pool size and query cache settings. The buffer pool size determines how much memory the server will use for caching data in memory. Increasing the buffer pool size can significantly improve server performance, especially for large databases. The query cache stores the results of commonly used queries in memory, which can also improve server performance. However, overusing the query cache can actually slow down the server, so it is important to find the right balance.
One common performance optimization technique is to use indexing. Indexes help speed up queries by allowing the database to quickly find the rows that match a given criteria. You should create indexes on columns that are commonly used in query conditions, such as primary keys and foreign keys. However, over-indexing can also slow down the server, so it is important to only create indexes where they are actually needed.
Securing your data is also an important aspect of configuring MySQL Server. You should consider implementing backup and recovery procedures to ensure that your data is safe in case of a system failure or other disaster. You can use tools like mysqldump to create backups of your databases, which can be stored in a secure location off-site. Additionally, you should consider implementing encryption measures to protect sensitive data, such as SSL/TLS encryption for network connections and encryption at rest for data stored on disk.
Finally, you should regularly monitor and tune your MySQL Server performance. There are several tools that you can use for this, such as MySQL Workbench and MySQL Enterprise Monitor. These tools allow you to monitor and analyze server performance metrics, such as CPU and memory usage, query performance, and disk I/O. Tuning your server can help improve performance and prevent potential issues before they occur.
In conclusion, configuring MySQL Server is an important step that should not be overlooked. By following the steps outlined in this article, you can ensure that your MySQL Server is properly configured for optimal performance, security, and data protection.
Creating a User and Database in MySQL

Before data can be stored in a MySQL database, it must have both a user and a database. In this section, we’ll walk you through the process of creating a user and a database using MySQL.
First, you’ll need to log in to MySQL as the root user. You can do this by typing the following command in your terminal:
mysql -u root -p
Once you’re in, you can create a new user with the following command:
CREATE USER 'newuser'@'localhost' IDENTIFIED BY 'password';
Replace newuser with the name you want to give your user, and password with a strong password.
Next, you must grant the new user privileges to the database. You can do this with the following command:
GRANT ALL PRIVILEGES ON dbname.* TO 'newuser'@'localhost';
In this command, dbname is the name of the database you wish to assign to the user. The .* in this line grants the user privileges on all tables in that database. If you want to grant a user privileges on only a specific table, replace the .* with the table name.
To reload the privileges table and implement the changes you’ve made, enter the following command:
FLUSH PRIVILEGES;
Your new user should now be created and granted permissions on your designated database.
It’s important to remember that after creating your user, you should immediately secure your MySQL installation by disabling the root login and removing anonymous user accounts. You can do this with the following command:
DELETE FROM mysql.user WHERE User='';
This command removes any anonymous user accounts. Afterward, to disable the root login, you can run the following command:
DROP USER 'root'@'localhost';
Once these steps have been completed, you should have a secure MySQL installation with a new user and database.
MySQL can be an excellent way to keep track of data and establish a secure database to store and organize your information. By following the steps in this tutorial, you are well on your way to creating your very own MySQL installation.
Connecting to MySQL Server and Verifying Installation
After installing MySQL, the next step is to connect to the server. To connect to the server, you need to have the following information:
- MySQL username and password: When you install MySQL, you are prompted to create a root password. This is the default user that you can use to connect to the server. You can also create other users with different privileges.
- MySQL hostname: This is the server where MySQL is installed. If you are installing MySQL on your local machine, you can use ‘localhost’ as the hostname.
- MySQL port number: The default port number for MySQL is 3306. If you changed the port number during installation, you should use that number.
Once you have this information, you can connect to the server using a MySQL client tool. There are many client tools available for MySQL, such as MySQL Workbench, phpMyAdmin, and HeidiSQL.
To connect to the server using MySQL Workbench, follow these steps:
- Open MySQL Workbench
- Click on the ‘New Connection’ button in the home tab.
- Add your connection details. Under the ‘Connection Method’ select ‘Standard (TCP/IP)’
- Enter your MySQL hostname and the port number.
- Enter your MySQL username and password, then click on ‘Test Connection’.
If the connection is successful, you will see a message that says ‘Successfully made the MySQL connection’.
Verifying MySQL installation involves checking that MySQL is running and that you can connect to the server. You can do this by running the following command in the command prompt:
mysqladmin -u root -p status
This command will prompt you to enter your password. Once you enter the correct password, you will get the following result:
Uptime: 37203 Threads: 1 Questions: 3 Slow queries: 0 Opens: 105 Flush tables: 1 Open tables: 98 Queries per second avg: 0.000
Another way to verify the MySQL installation is to run a sample query. You can do this by running the following command:
mysql -u root -p -e "show databases;"
This command will show you a list of all the databases installed in the MySQL server. If you can see the list of databases, it means that your MySQL installation is working properly.