
Understanding Proxmox Virtual Environment
If you’re looking for a complete virtualization solution that can manage both container-based and hardware-based virtual machines, then Proxmox Virtual Environment (PVE) is the answer. Proxmox VE is an open-source virtualization platform that is based on Debian Linux and KVM (Kernel-based Virtual Machine) technology. PVE makes it possible to run several virtual machines on a single physical host and lets you manage them using a web interface. In this tutorial, we will go over how you can install PVE on a dedicated server or a virtual machine running on a hypervisor.
One of the most significant advantages of using Proxmox is the ease of setting up and managing VMs. PVE uses a web-based user interface to allow users to manage physical hosts, clusters, and VMs in a centralized way. This web interface provides direct access to all necessary management options, including creating or deleting VMs, creating disks, editing network settings, and configuring backups.
Before diving into the installation, it’s essential to understand the different components of PVE. Firstly, the Proxmox hypervisor is an open-source version of the KVM hypervisor, which is optimized for running multiple VMs on a single host. PVE also includes LXC containers, which provide a lightweight alternative to fully virtualized VMs. LXC containers use the same kernel as the host, which provides faster I/O access and minimal overhead. PVE supports many popular guest operating systems, including Windows, Linux, and BSD.
Another essential feature of PVE is the ability to create and manage clusters, allowing you to distribute VM workloads across multiple physical hosts. PVE allows administrators to set up a cluster of multiple physical hosts, and they can use the web interface to manage the entire cluster from one place. Clustering allows administrators to increase the reliability and availability of their virtual infrastructure.
Another great feature of PVE is the built-in backup system, which can be configured to take backups of VMs, containers, and even the entire Proxmox installation. Backups can be saved to local or remote locations and can be scheduled to run automatically. The backup system also provides the ability to restore VMs from backup in case of any problems.
In conclusion, Proxmox Virtual Environment is a versatile virtualization platform that provides excellent support for containers and virtual machines. The web interface makes it easy to manage VMs, clusters, and backups, and its open-source nature provides the freedom to customize and extend the platform as needed. With this tutorial, you should be able to install Proxmox on your system and start exploring its features.
Hardware Requirements and Compatibility
Proxmox is an open-source virtualization platform that offers powerful features for managing virtual machines, containers, and software-defined storage. Before installing Proxmox on your hardware, it is important to determine the hardware requirements and compatibility with the platform.
The hardware requirements for Proxmox vary depending on the type and number of virtual machines or containers you plan to run. In general, Proxmox can be installed on almost any standard x86-64 hardware configuration with at least 4 GB of RAM and a 64-bit processor. However, if you plan to run more than a few virtual machines or containers, it is recommended to use hardware with higher specifications to ensure optimal performance.
The following are the recommended hardware requirements for different Proxmox configurations:
- Single Server: If you plan to use Proxmox on a single server, it is recommended to use hardware with at least 16 GB of RAM, a quad-core processor, and multiple hard drives for storage.
- Clustered Configuration: If you plan to use Proxmox in a clustered configuration, you will need a minimum of two servers with identical hardware configurations. Each server should have at least 32 GB of RAM, a six-core processor, and multiple hard drives for storage. The servers should be connected using a high-speed network interface, such as 10 Gigabit Ethernet or InfiniBand, for optimal performance.
- Software-Defined Storage: If you plan to use Proxmox for software-defined storage, you will need hardware with high-capacity hard drives or solid-state drives (SSDs) for storage. It is recommended to use RAID configurations or distributed storage systems, such as Ceph or GlusterFS, for data redundancy and high availability.
In addition to the hardware requirements, it is important to ensure that your hardware is compatible with Proxmox. The Proxmox website provides a hardware compatibility list (HCL) that includes certified hardware configurations for Proxmox. The HCL includes information on servers, network interface cards (NICs), storage controllers, and other hardware components that have been tested with Proxmox.
Before installing Proxmox, it is recommended to check the HCL to ensure that your hardware is compatible with the platform. If your hardware is not listed on the HCL, it does not necessarily mean that Proxmox will not work on your hardware. However, it is recommended to test the hardware with Proxmox before deploying it in a production environment.
To check the hardware compatibility with Proxmox, you can use the Hardware Compatibility Test tool provided by the Proxmox team. The tool is a bootable ISO image that can be used to test the hardware compatibility with Proxmox before installing it. The tool tests the hardware components, such as NICs, storage controllers, and other peripherals, to ensure that they are compatible with Proxmox.
In conclusion, Proxmox is a powerful virtualization platform that can be installed on almost any standard x86-64 hardware configuration. It is important to ensure that your hardware meets the recommended specifications for optimal performance. Additionally, checking the hardware compatibility with Proxmox before installing it can prevent compatibility issues and ensure a smooth deployment.
Pre-installation Tasks and Considerations
If you’re planning to install Proxmox, there are a few things to consider beforehand. For starters, you’ll need to decide on the hardware you’ll use. Take into account the number of virtual machines you’ll be running, as well as the RAM, CPU, and storage space you’ll need for each one. Proxmox is designed to work well with Linux-based systems, so it’s best to use a Linux distribution as your base operating system.
Before you start the installation process, make sure you back up all of your data. This will help ensure that if anything goes wrong during the installation process, you won’t lose any important information. Additionally, you should ensure that your network connection is stable and fast. This will ensure that you can complete the installation of Proxmox without any issues.
Once you have your hardware and data backed up, you’re ready to begin the installation process. To do this, you’ll need to start by configuring your server, which will include setting up the necessary network and hardware components. You’ll also need to install and configure a firewall to protect your system.
Next, you’ll need to choose the version of Proxmox you want to install. There are two primary versions of Proxmox: the stable version and the latest version. The stable version is recommended for production use, while the latest version is recommended for testing purposes only.
Once you’ve chosen your version, you’re ready to begin the installation. The installation process will guide you through a series of steps, starting with the installation of the Proxmox operating system. During the installation process, you’ll be prompted to select your disk partitioning scheme, create or select a user account, and configure your network settings.
After the installation process is complete, you can start configuring Proxmox. This will include setting up virtual machines, choosing the operating system for each VM, and configuring storage options. You’ll also need to configure any additional services you plan to run on the server, such as backup and monitoring services.
In conclusion, Proxmox is an excellent virtualization platform with a wide range of features and customization options. By considering the hardware and software requirements, backing up your data, and following the installation process carefully, you can have a successful installation that will provide you with a reliable and versatile virtualization platform to run your business.
Step-by-Step Installation Guide
In this section, we will guide you through the Proxmox installer. The process is straightforward and shouldn’t take too much time.
Step 1: Download the Proxmox ISO file
The first step is to download the Proxmox ISO file from the official website. You can either use the ‘Download’ button or the ‘Torrent’ link. The file size is around 728 MB, so you’ll need a fast and stable internet connection to complete the download.
Step 2: Burn the ISO file to a DVD or USB drive
Once you’ve downloaded the ISO file, the next step is to burn it to a DVD or USB drive. If you’re using a DVD, make sure you use a DVD burner software that can burn ISO files. If you’re using a USB drive, you can use the built-in Windows tool or download a third-party tool like Rufus.
Step 3: Boot from the DVD or USB drive
After you’ve burned the ISO file to a DVD or USB drive, the next step is to boot your computer from it. Make sure your computer is set to boot from the DVD or USB drive before the hard drive. You can do this by going into BIOS and changing the boot order.
Step 4: Start the Proxmox installer
After your computer has booted from the DVD or USB drive, you’ll be presented with the Proxmox installer. The first thing you should do is select your preferred language. The installer supports various languages, so make sure you select the one you’re most comfortable with.
Next, you’ll be asked to choose your keyboard layout. The default layout is US, but if you’re using a different layout, make sure you select it from the list.
Once you’ve selected your language and keyboard layout, click the ‘Next’ button to proceed.
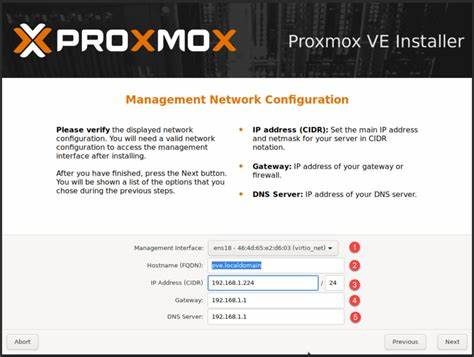
Step 5: Configure network settings
The next step is to configure your network settings. If you’re using DHCP, the installer should detect your network settings automatically. If you’re using a static IP address, make sure you enter the correct values.
If you’re not sure what your network settings are, you can check them in your router’s settings or contact your network administrator.
Once you’ve entered your network settings, click the ‘Next’ button to proceed.
Step 6: Choose the installation type
The next step is to choose the installation type. You can either choose a ‘Normal Installation’ or a ‘Minimal Installation’. The ‘Normal Installation’ includes all the packages, while the ‘Minimal Installation’ only includes the basic packages.
For most users, the ‘Normal Installation’ is recommended. However, if you’re installing Proxmox on a low-spec machine, you might want to choose the ‘Minimal Installation’ instead.
Once you’ve selected your preferred installation type, click the ‘Next’ button to proceed.
Step 7: Choose the disk to install Proxmox
The next step is to choose the disk where you want to install Proxmox. The installer will display a list of all the available disks on your computer. Make sure you select the correct disk where you want to install Proxmox.
If your disk is not listed, you might need to check if it’s properly connected to your computer.
Once you’ve selected your disk, click the ‘Next’ button to proceed.
Step 8: Confirm the installation
The last step is to confirm the installation. The installer will display a summary of all the settings you’ve entered so far. Make sure everything is correct before you proceed.
If you’re happy with the settings, click the ‘Finish’ button to start the installation process. The installer will format your disk and install Proxmox on it. The process might take some time, so you’ll need to be patient.
Conclusion
Installing Proxmox is a straightforward process that shouldn’t take too much time. By following this guide, you should be able to install Proxmox without any issues. If you encounter any problems, feel free to ask for help in the Proxmox community forum.
Initial Configuration and Management of Proxmox
Welcome to the install tutorial for Proxmox. In this article, we will cover the initial configuration and management of Proxmox, an open-source virtualization management solution.
Step 1: Download and Install Proxmox
The first step to configure Proxmox is to download and install the Proxmox VE ISO file. This can be done by visiting their official website and downloading the latest version of the software.
Once you have downloaded the ISO file, you can now install Proxmox VE by burning the ISO image to a CD or USB drive. Then, you can boot your server from the CD or USB drive and follow the on-screen instructions to install Proxmox VE.
Step 2: Configure Network Settings
After you have installed Proxmox, you will need to configure your network settings. By default, Proxmox comes with a DHCP client enabled. If you have a DHCP server on your network, you will receive an IP address automatically.
However, if you want to assign a static IP address, you can do so in the Proxmox web interface. Go to the “Network” tab, select the network interface you want to configure, and click on “Edit.” From there, you can assign a static IP address, netmask, and gateway.
Step 3: Create a New Virtual Machine
Now that you have configured your network settings, you can create a new virtual machine in Proxmox. To do this, go to the “Create VM” tab in the web interface, select the operating system you want to install, and set the parameters to your desired values.
Once you have created the virtual machine, you can install the operating system as you would on a physical machine.
Step 4: Configure Storage
Once you have installed the operating system, you will need to configure storage for your virtual machines. To do this, go to the “Datacenter” tab in the web interface and select “Storage.” From there, you can add a new storage device and configure it with the parameters you want.
You can choose from a variety of storage types, including local storage, NFS storage, iSCSI storage, and more. Choose the storage type that best suits your needs.
Step 5: Create a Backup Schedule
Now that you have configured your network settings and created virtual machines, it’s time to create a backup schedule for your virtual machines. Proxmox makes it easy to create backups with its built-in backup tool.
To create a backup schedule, go to the “Backup” tab in the web interface and click on “Create.” From there, you can set the backup time, choose the virtual machines you want to back up, and configure other backup settings.
By following these steps, you can configure and manage your Proxmox server with ease. Proxmox is a powerful and flexible virtualization management solution that can help you streamline your server infrastructure.