
Troubleshooting Steps for a Disposable Vape that Won’t Hit
Disposable vapes have become popular in recent times due to their convenience and ease of use. They are designed for one-time use, making them ideal for those who don’t want to invest in a vape device. However, when a disposable vape won’t hit, it can be frustrating, and it means that you’re not getting the most out of your device. Fortunately, there are troubleshooting steps you can take to get your disposable vape working again.
Here are some steps to follow:
Contents
1. Check the Battery
The first thing you should check when your disposable vape won’t hit is the battery. The battery is what powers the device, so if it’s not working correctly, you won’t get a hit. If the disposable vape has a button, press it a few times to see if the battery is dead. If the button light flashes or the device vibrates, it means the battery is working, but the problem may be with the connection between the battery and the cartridge.
If the button doesn’t work, try charging the device. Plug it into a USB charger or a wall adapter and allow it to charge for about 20 minutes. Once it’s fully charged, try to take a hit. If the battery is still not working, it may be faulty, and you may need to get a replacement.
Tip: If you’re using a disposable vape without a button, simply take a puff, and it should activate the device. However, if you’ve tried to take a hit, and it’s still not working, move on to the next troubleshooting step.
2. Check the Connection Between the Battery and Cartridge

The connection between the battery and cartridge is essential for the device to work correctly. If there is no connection, or it is loose, the disposable vape won’t hit. To check the connection, remove the cartridge from the battery and inspect both the battery and cartridge for any debris or damage.
Use a cotton swab to clean the battery’s threads and the inside of the cartridge. If there is any damage, such as a bent pin, you may need to get a replacement. Carefully reattach the cartridge onto the battery, ensuring that the connection is tight. Try taking a hit again.
3. Unclog the Airflow
If the airflow is clogged, it can prevent the disposable vape from hitting. Airflow is essential to create the vapor and deliver it to the user. To fix this issue, you can try blowing into the mouthpiece or covering the airflow holes on the device and taking a few quick puffs.
This should help dislodge any clogs or debris that may be blocking the airflow. If the airflow is still clogged, you can try using a toothpick or a needle to remove any debris or blockages inside the airflow tubes. Be gentle, as you don’t want to damage the device.
4. Dispose of the Device
If you’ve tried all the troubleshooting steps above and your disposable vape still won’t hit, it may be time to dispose of it. Disposable vapes are designed for one-time use, and they don’t have replaceable parts. Once the battery dies, or the e-liquid runs out, the device is no longer usable.
Tip: Always dispose of disposable vapes in the appropriate way. Check with your local regulations to see how to dispose of them safely, as some components can be harmful to the environment if not disposed of correctly.
By following the troubleshooting steps outlined above, you should be able to get your disposable vape working again. If, however, the device is still not working after trying all the steps, it may be time to get a replacement. Always remember to follow the manufacturer’s instructions for use and dispose of disposable vapes in the right way to protect the environment.
Cleaning the Airflow Vents to Fix a Non-Working Disposable Vape

If your disposable vape is not hitting, there could be several reasons why this is happening, including problems with the battery, the airflow vents, or the e-liquid itself. One of the most common reasons why a disposable vape may not be hitting is because of clogged or dirty airflow vents. If the airflow vents are not working properly, then e-liquid cannot be vaporized and inhaled. In this guide, we’ll show you how to clean the airflow vents on your disposable vape so that it works properly again.
The first step is to locate the airflow vents on your disposable vape. These are usually located near the bottom of the device and can usually be found by looking for small holes in the sides of the device. Once you’ve found the airflow vents, you can start cleaning them using a Q-tip or a small brush.
Dip the Q-tip or brush in a little bit of rubbing alcohol or water and gently scrub the airflow vents. Be careful not to press too hard or you could damage the device. The goal is to remove any debris, dust, or residue that may be clogging the airflow vents. You can also blow through the mouthpiece of the disposable vape to help dislodge any dust or residue that may be inside the device.
After cleaning the airflow vents, wipe them down with a dry cloth and let the device sit for a few minutes to dry. Once the airflow vents are dry, you can try using the disposable vape again to see if it works properly. If it still doesn’t hit, then there may be other issues with the device that need to be addressed.
In conclusion, if your disposable vape is not hitting, cleaning the airflow vents is one of the first things you should try. This is a simple and easy process that can be done with a few household items. By cleaning the airflow vents, you can ensure that your disposable vape is working properly so that you can enjoy your favorite e-liquid flavors without any issues.
Checking for a Clogged Atomizer in a Disposable Vape
If you’re someone who uses disposable vapes quite often, it can be frustrating to have an issue where your vape pen won’t hit. There are a lot of issues that could be preventing your disposable vape from working, but one of the most common reasons could be a clogged atomizer. Vape oil tends to get thick and sticky over time and the residue can cause an obstruction in the vape. In this article, we’ll explain how you can identify if the atomizer is clogged in your disposable vape, and how you can take care of it to ensure it works properly.
The first sign of a clogged atomizer is that you might not be getting much vapor from your disposable vape, or your hits might be very weak. This is caused by the buildup of excess residue from the oil. When the atomizer is clogged, it cannot heat the remaining oil in the vape cartridge effectively, hence why you might not be getting enough vapor from it.
The next sign you should look out for is if your vape pen starts to make a gurgling sound when you take a hit. This sound usually occurs due to excess oil in the vape cartridge, and sometimes it may even cause the oil to leak from the cartridge, which is also a sign that the atomizer is clogged.
You can also identify if the atomizer is clogged by removing the cartridge from the battery and inspecting the small air holes at the base of the cartridge using a flashlight. If there is some buildup on the holes or residue inside the cartridge, then there is a pretty high chance that the atomizer is clogged.
To clean the blocked atomizer, you need to follow a few simple steps. First off, remove the cartridge from the battery then try to loosen any excess oil in the cartridge by gently blowing into the opening where you usually inhale. Be careful while doing this as you do not want your mouth to touch the vape cartridge.
After you finish blowing into the cartridge, use a cotton swab or a toothpick to gently clean the air holes and inside of the cartridge. Be careful not to put the cotton swab too deep inside the cartridge as this could damage the atomizer. You can also use the cotton swab or toothpick to gently clean the surface of the atomizer. Make sure you don’t use too much pressure, as this could also damage the atomizer.
A slightly less messy method would be to remove the cartridge from the battery, then put it under a light heat source. A hairdryer on the lowest heat setting can work. This will make the oil in the cartridge more viscous and easier to remove. Once the oils have been loosened, use a cotton swab to wipe off any remaining residue. You should do this whilst holding the cartridge upside down to make sure no excess oil drips onto the battery.
In conclusion, if your disposable vape is not hitting, the atomizer may be clogged with excess oil or residue. This clogging can be caused by a buildup of oil in the cartridge and air holes. It is important that you clean your vape regularly and maintain it well to avoid clogs. If your disposable vape is still not hitting after attempting to clean the atomizer, you may need to replace the cartridge entirely.
Resolving Battery and Connection Issues in a Disposable Vape
One of the most common issues encountered by vapers while using disposable vapes is the battery and connection issues that prevent the vaping device from hitting. If you are encountering a similar problem, then it is good to start with a thorough inspection of the battery and connection to check for any leakage, blockage, or any misalignment. Here are some useful tips and techniques that you can use to fix battery and connection issues in a disposable vape:
1. Check the Battery Level
One of the most common reasons why disposable vapes don’t hit is a weak battery. Checking the battery level is easy if you have a device with a built-in LED indicator that provides information about the power level. If the power is low, you can try recharging the disposable vape to see if it solves the problem. However, if the device refuses to charge, then it’s time to dispose of it and buy a new one.
2. Clean the Metallic Connection Points
The metallic connection points that allow the flow of the battery power can sometimes get dirty, causing connection issues. To fix this, you need to gently clean the connection points using a cotton swab dipped in rubbing alcohol or water. Make sure that you don’t use excessive pressure or liquids while cleaning the connection points as it may result in damaging the device’s internal components.
3. Check the Airflow
Lack of airflow can cause the disposable vape to malfunction or prevent it from hitting. Every disposable vape has an airflow adjustment mechanism that allows the user to customize the airflow according to their preference. If you are experiencing a blocked airflow, it might be time to check and adjust the airflow of the device.
4. Adjust the Pin Connection
Many disposable vapes come equipped with a circular pin-like structure on their connection points that enable the device to make contact with the battery properly. Sometimes, these pins might become misaligned or pushed deep into the device, causing connection issues. To fix this, you need to use a small screwdriver or pin tool to adjust the pin, or gently pull it out to ensure it is properly aligned with the battery. Be careful while applying the required force, as excessive pressure can cause damage to the device.
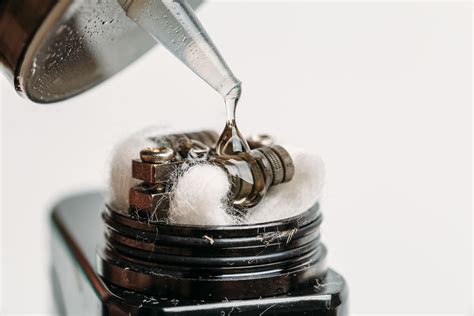
5. Check the Coil
The coil is the heating element of a disposable vape that converts the liquid into vapor. Any damage to the coil or gunk buildup can prevent the device from hitting. To fix this, remove the tank and check the coil for any signs of damage or gunk. If you find any gunk buildup, use a cotton swab dipped in water or alcohol to clean it. However, if the coil is damaged, it is time to dispose of the device and buy a new one.
In conclusion, fixing battery and connection issues in a disposable vape is not as complicated as it might seem. You don’t have to dispose of the device right away; instead, you need to check a few things before declaring the device useless. By following the above tips, you can quickly troubleshoot and fix most battery and connection issues in a disposable vape to ensure a pleasant vaping experience.
Refilling a Disposable Vape that is Not Hitting Properly
Are you experiencing the inconvenience of a disposable vape that won’t hit properly? Don’t worry; you’re not alone. Many vapers encounter this problem, but not everyone knows how to fix it. In this article, we will guide you on how to refill a disposable vape that is not hitting properly.
Step 1: Gather Your Tools and Materials
The first step in refilling a disposable vape is to gather all the necessary tools and materials. You’ll need a pair of scissors, a new e-liquid bottle, a flashlight, and your disposable vape. Choose a new e-liquid bottle that has the same flavor and nicotine strength as the previous one.
Step 2: Find the Airflow Hole
Before refilling your disposable vape, you need to locate the airflow hole. This hole is responsible for delivering the vapor to your mouth when you take a puff. Typically, the airflow hole is located at the bottom of the vape. Shine a flashlight to help you locate it easily.
Step 3: Cut Off the Clear Tape
Once you locate the airflow hole, use your scissors to cut off the clear tape on the bottom of the vape. Be careful not to damage the wires inside. You can use your fingers to remove any leftover adhesive residue.
Step 4: Refill the E-liquid
Now that the tape is removed, you can start refilling the e-liquid. Take your new e-liquid bottle and insert the tip into the airflow hole. Don’t overfill it because it may cause leaks. Once you’ve filled it, let the vape sit for a few minutes to allow the coil to soak the e-juice thoroughly.
Step 5: Reattach the Bottom Tape
After letting the e-liquid soak for a few minutes, you can reattach the bottom tape. Make sure to seal it well to prevent any leaks. Once you’ve reattached the tape, give the vape a gentle shake to distribute the e-liquid evenly. Lastly, give it a test puff to see if it’s hitting properly. If not, repeat the process.
In conclusion, refilling a disposable vape that is not hitting properly is easy, and it’s a great way to save money. All you need are the right tools and materials, a little bit of patience, and you can fix your disposable vape in no time. Remember that proper care and maintenance of your vape can prolong its lifespan and provide a more enjoyable vaping experience.