
Understanding the Causes of Rust in Cab Corners
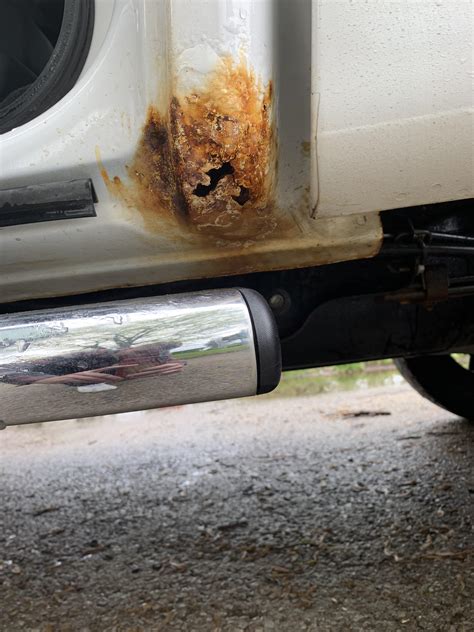
Rust is a common problem that affects many vehicles, and it can be quite frustrating for the car owner when it starts to appear on cab corners. For those who are not familiar, a cab corner is the area at the bottom of the cab where it meets the bed of a pickup truck. If your vehicle has started to show rust on the cab corners, there is no need to get worried as it is a common issue. In this section, we will discuss the underlying reasons behind rust in cab corners.
The root cause of rust in this portion of the truck is a combination of factors such as dirt, moisture, and road debris. The cab corners are exposed to a lot of mud, salt, snow, and rain, which can accumulate in small pockets and cause corrosion. The accumulation of moisture and debris in particular crevices creates a perfect environment for oxidation, which is a chemical reaction that happens when metals like iron interact with oxygen. This reaction leads to the formation of rust, which can weaken and damage the structure of the cab corner.
One compelling reason for the accumulation of debris is that cab corners are usually designed with crevices or pockets that can collect dirt and moisture. These crevices can trap water, salt, and dirt, making it difficult to wash them and can lead to corrosion over time. Additionally, since the cab corner is close to the ground, it can easily pick up debris that can scratch the paint, exposing the metal to the elements which can cause rust to form.
Other reasons that contribute to rust in cab corners include poor manufacturing, inadequate rust protection on the metal, or exposure to salt water. Most trucks do not have a proper drainage system, which means that water and debris can accumulate in certain parts of the truck, leading to rust. Moreover, when painting or undercoating is not applied correctly, the underlying metal is left exposed, making it vulnerable to oxidation and rust.
It is also essential to consider the weather condition of the area where the truck is used. For instance, in areas where it snows regularly or rains a lot, the roads are heavily salted which in turn increases the likelihood of rust occurrences. The salt, when mixed with water and splashed into the cab corner, can cause the metal to corrode over time, leading to rust spots, and if not taken care of, these can become larger, eventually weakening the strength of the metal.
In conclusion, rusting on cab corners is a common issue that most truck owners face at some point. The moisture, dirt, and debris that accumulates on cab corners can lead to the formation of rust. Some factors that contribute to rust include poor manufacturing, lack of rust protection, exposure to saltwater, and weather conditions. It is essential to regularly clean your truck and periodically inspect it for rust spots or damage. By taking proactive measures to prevent corrosion, you can prolong the lifespan of your vehicle and keep it looking good.
Assessing the Extent of Rust Damage in Cab Corners
One of the primary concerns of vehicle owners is rusting and corrosion. One of the most affected parts of the vehicle is the cab corners. The primary cause of rusting in cab corners is exposure to moisture, salt, and other chemicals used in de-icing roads. The first step in fixing rusted cab corners is assessing the extent of the damage. Let’s take a closer look at how to assess the extent of rust damage in cab corners.
1. Location: The location of the rust plays a significant role in determining the extent of the damage to the cab corners. It is not uncommon for rust damage to occur from the inside of the cab corners and spread to the surface. The extent of damage is typically not visible from the surface. However, a careful assessment can help to identify areas of rust from the inside. A basic visual inspection can provide an initial assessment of the location of the rust damage. Using a screwdriver or tapping the surface with a hard object can help identify the extent of rusting present.
2. Extent of rust damage: The extent of rust damage will determine the approach needed to fix the cab corners. A cursory assessment will help identify the severity of the situation. If the rust damage is mild and localized, cleaning and painting the affected areas is all that’s necessary. However, if the rust is extensive, replacing the cab corners may be the only solution. To determine the extent of rust damage, use a screwdriver to identify areas with weak metal. If the screwdriver penetrates the surface, it is a sign that the metal has weakened and requires repair.
It is essential to carefully assess the cab corners’ extent of rust damage before undertaking any repairs. Failure to do so may result in further damage and costly repairs.
3. Structural Integrity: Once you’ve determined the extent of the rust damage, the next step is assessing the structural integrity of the cab corner. If the damage is significant, the structural integrity of the cab corners may be compromised. In such cases, it is best to replace the entire cab corners to ensure vehicle safety. Ignoring rusty cab corners can lead to further deterioration and even accidents if the cab corners give way due to structural weakness.
4. Type of Material: The type of material used in the construction of the cab corners is an important consideration when assessing the extent of rust damage. Aluminum cab corners, for example, are resistant to rusting compared to steel cab corners. However, aluminum cab corners may be expensive to replace compared to steel cab corners. Identifying the type of material used in the cab corners will determine the approach to fixing the damage and the cost involved in the repairs.
In conclusion, assessing the extent of rust damage in cab corners is the first step in fixing rusted cab corners. A careful assessment of the location, extent of damage, structural integrity, and type of material used in the cab corners will determine the repair required to fix the rusted cab corners. It is essential to address rust damage promptly to prevent further damage to the vehicle.
Preparing the Cab Corners for Repair
Before repairing the rusted cab corners, it is crucial to prepare the surface adequately. Proper preparation ensures that the repair lasts long and prevents the rust from spreading to the rest of the truck. Here are the steps to follow when preparing the cab corners for repair:
- Gather the necessary tools and materials: You will need a grinder, sandpaper, metal shears, body filler, body filler applicator, fiberglass cloth, a paint gun, and the appropriate paint color for your truck. Ensure that you wear protective gear, including safety gloves, goggles, and a mask, when handling these materials.
- Cut out the rusted portion of the cab corner: Using metal shears, cut out the rusted part of the cab corner. Ensure that you cut at least an inch beyond the rusted area to remove any hidden rust. This step is crucial as it prevents the rust from spreading further into the truck’s body.
- Clean the surface: Using a grinder and sandpaper, smooth out any rough edges around the cut-out area. Ensure that you remove any flaking paint and rust from the surface. Clean the area using a wax and grease remover to remove any grease, wax, or oil that may be present.
- Apply body filler: Mix the body filler and hardener according to the manufacturer’s instructions. Using a putty knife or body filler applicator, apply the body filler over the cut-out area. Ensure that you spread the filler evenly and leave no air pockets. Allow the filler to dry until hard.
- Apply fiberglass: Cut the fiberglass cloth to the appropriate size and apply it over the body filler. Ensure that you press it down firmly to eliminate any air pockets. Apply a second coat of body filler over the fiberglass to provide additional strength.
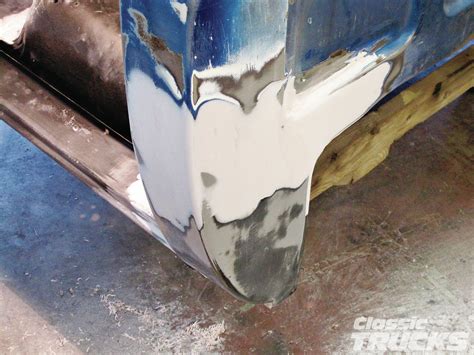
- Sand and prime the surface: Once the body filler and fiberglass have dried, use sandpaper to smooth out the surface around the repair area. Ensure that you smooth out any uneven surfaces. Clean the repaired area again using a wax and grease remover. Primer the repaired area to ensure that the paint adheres to the surface.
- Paint the cab corners: Once the primer has dried, paint the cab corners using the appropriate paint color. Ensure that you follow the manufacturer’s instructions when applying the paint. Allow the paint to dry, and reapply if necessary.
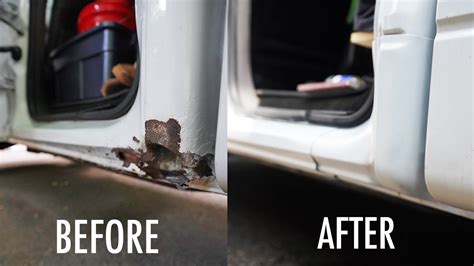
- Finish up: After the paint has dried, remove the masking tape used to cover any areas you did not want to paint. Buff the surface using a rubbing compound to remove any swirl marks or imperfections. Your rusted cab corners are now repaired and look like new!
By following these steps, you can prevent the rust from spreading to the rest of your truck and extend its lifespan. It is important to take care of rusted cab corners as it affects the structural integrity of your truck and reduces its value.
Repairing Rust Holes in Cab Corners with Welding
If the rusted area of your cab corner is beyond repair by using body filler, you may need to use welding. Welding is strong and durable, and it can bond metal parts together securely. Welding is a labor-intensive technique and requires specialized equipment, so it’s advisable to seek professional help if you’re not a DIYer. Alternatively, if you’re confident in your abilities, you can rent a welding machine, learn how to use it by watching online videos. Here are steps you can follow.
Clean the Rust Excess
To begin fixing rust holes in cab corners using welding, you must first rid the rusted parts of any dirt, debris, or flaky rust. Different rust cleaners, including wire brushes, sandpaper, and grinders, can detach rust from the affected area. A grinder outfitted with a flap disc wheel can quickly remove any rust layers. After you have cleaned and exposed the surface of the rusted parts, put on safety goggles, respirator, and ear muffs.
Cut the Damaged Corner
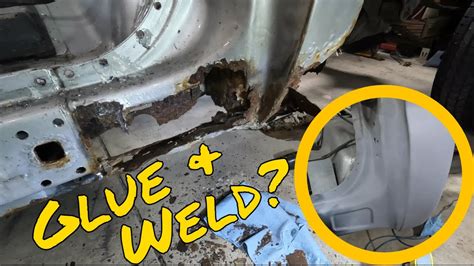
To reach the affected area, it’s ideal to cut out the damaged sections carefully. Make sure when cutting that you keep the cut within a small margin surrounding the rusted area, where welding will still be possible. Having done that, carefully trace and cut out the damaged section of your cab corner. This process ensures that the metal gets an even, smooth cut, making it easier to seal any holes correctly.
Weld the Cab Corners together
The final step in fixing rust holes in cab corners using welding is to weld the cab corners together. Before welding, make sure that the surrounding area of the damaged corner is clean, align the replacement metal in the cavity you cut out earlier, and use C-clamps to hold it in place. After aligning the new metal, use a MIG welder to weld the new metal, ensure that you apply pressure and hold the welding wire in place until you can create the pool of melted metal. Allow the metal to solidify and cool before removing the clamps. Grind the welded area, and remove any weld slag that may have stuck on it. Apply a rustproof primer to the welded area, and paint it with a matching color paint to protect it from further rusting.
Conclusion
Fixing rust holes in cab corners using welding is not an easy task. It’s a process that requires experience with a MIG welder, welding mats, and the right safety gear. If welding is not your line of work, consider involving a professional mechanic for repairs. If you would like to learn how to use welding equipment, it’s essential to start by practicing on a small metal piece before welding the cab’s corners. It will take some time, but practicing will help you perfect the art and give you the confidence to carry out the repairs successfully.
Finishing Touches: Sanding, Painting, and Sealing the Cab Corners
After you have successfully removed the rust and added new metal to your cab corners, the next step is to finish the job by sanding, painting, and sealing the cab corners. This final step ensures that your truck not only looks good but is also protected from future rust damage. In this article, we will take you through the process of sanding, painting, and sealing your cab corners.
Sanding
The first step in finishing your cab corners is sanding them. This is done to remove any rough edges and prepare the surface for painting. To sand your cab corners, you will need a sanding block or sandpaper. Start by using a coarse grit sandpaper and then gradually move to a finer grit. This will help you to get a smooth surface for painting. You should be careful not to sand too much, as this may damage the metal. Once you are done sanding, make sure that you clean the surface with a clean, dry cloth.
Painting
The next step is to paint your cab corners. Painting your cab corners not only makes them look good but also protects them from future rust damage. When it comes to painting your cab corners, you have two options: you can either use spray paint or brush-on paint. Spray paint is more convenient, but brush-on paint gives you more control. If you choose spray paint, it is important to use a primer first to ensure that the paint adheres to the surface. It is also important to use enough paint to cover the surface evenly.
If you choose to use brush-on paint, you have more control over the application, but it may take longer. With brush-on paint, you can apply multiple coats until you achieve the desired coverage. Whichever option you choose, make sure that you follow the manufacturer’s instructions.
Sealing
Once you have painted your cab corners, the final step is to seal them. Sealing your cab corners protects the paint from fading and peeling, and also prevents water and other elements from getting in and causing rust to form again. The best sealers for cab corners are silicone-based sealants or urethane sealants. These sealants are flexible, which means that they can expand and contract with the metal, preventing cracking and peeling of the paint. Before applying the sealer, make sure that the surface is clean and dry.
Apply the sealer using a sealant gun, making sure to cover the entire surface. Make sure that you apply enough sealant to fill any gaps or cracks that may be present. Finally, use your finger or a clean cloth to smooth out the surface of the sealant. Wait for the sealant to dry, as per the manufacturer’s instructions, before exposing your cab corners to any elements.
In conclusion, finishing touches like sanding, painting, and sealing your cab corners are crucial steps in fixing rusted cab corners. They not only make your truck look good but also protect it from future rust damage. You should be careful and follow the manufacturer’s instructions when sanding, painting, and sealing your cab corners.